Tuesday, April 16, 2024
Home Blog Page 2

Define Pattern in Photoshop

Define Pattern in Photoshop

In this Photoshop Lesson, we’ll learn about ‘Define Pattern command in Photoshop‘ and ‘How to make a pattern in Photoshop’. Define Pattern command is available under Edit menu in Photoshop.

My name is Lalit Adhikari and we are at LTY. Let’s begin!


Related Topics:


What is a Pattern in Photoshop

A pattern is an image or visual that is repeated or tiled. Tiling, here, means sub-dividing a computer graphics selection into a series of squares and placing them on a layer or within the selection.

We can use patterns in Photoshop to fill a layer or selection. Photoshop comes with various preset patterns. We can create new patterns and save them to use with different tools and commands.

Preset patterns are displayed in the pop-up panels in the option bar for the Paint Bucket tool, Pattern Stamp tool, Healing Brush and Patch tools as well as in the Layer Style dialog box.

We can change how patterns are displayed in the pop-up panels by choosing a display option from the pop-up panel menu.


Related Topics:


How to make a Pattern in Photoshop

To make a pattern from a image, we’ll need a base image. This base image will provide us with parts to be used as pattern. For this tutorial, I’ve chosen the following image.

Royalty free image from Pexels

Now, follow the steps below.

Step 1: Open image in Photoshop
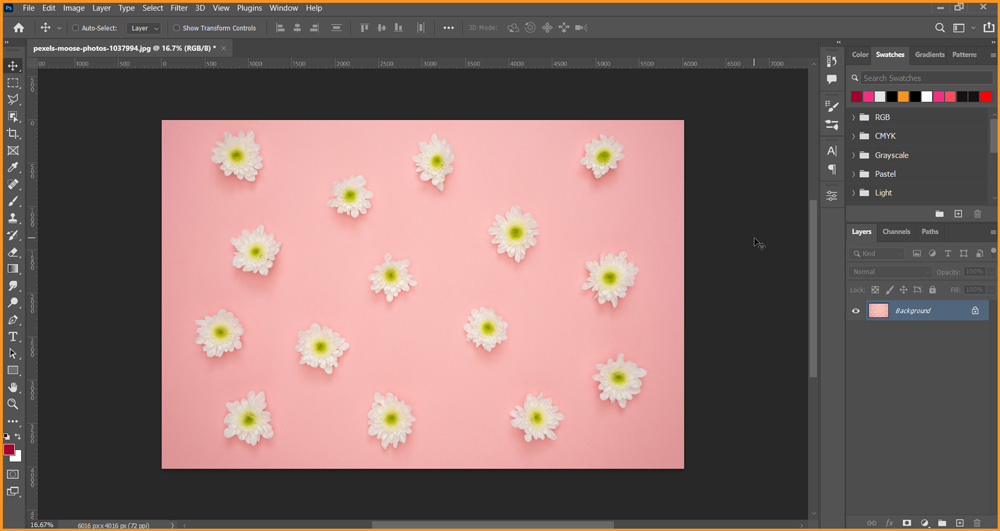
Image open in Photoshop

Step 2: Select Rectangular Marquee Tool

Select Rectangular Marquee Tool and create a selection around the part of the image to be used as pattern.
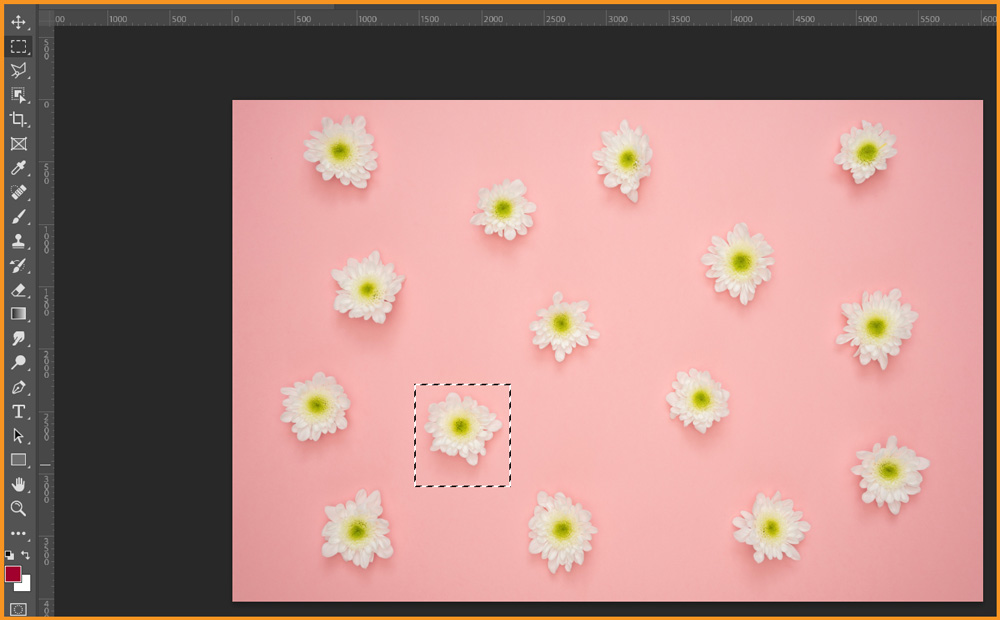
Rectangular selection around one of the flowers
Selection created using Rectangular Marquee Tool

Step 3: Go to Edit > Define Pattern…

Define Pattern in Photoshop
Define Pattern command under Edit menu

The following dialog box will open.

Define pattern in photoshop
Define Pattern dialog box

Enter a name for the pattern and click OK.


Step 4: Create a New Document

Now, we’ll create a New Document to try out our new pattern.


Step 5: Go to Edit > Fill

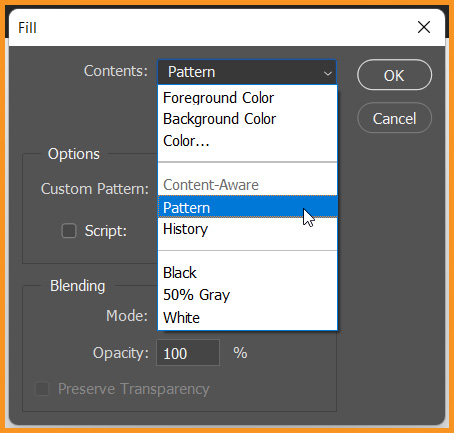
After creating new document, go to Edit > Fill and chose following settings in the dialog box.

  • From contents, chose Pattern.
Fill command dialog box in photoshop
Fill dialog box
  • From Custom Pattern chose the newly defined pattern at the bottom.
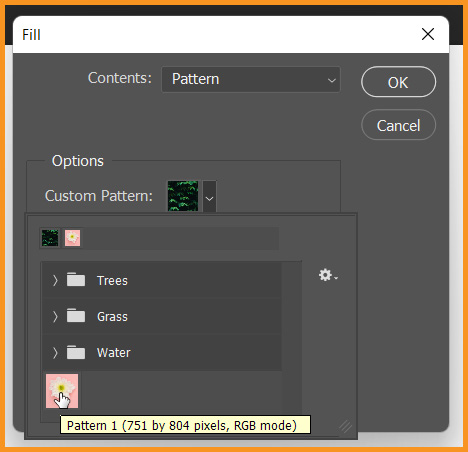
Fill command dialog box in photoshop
Fill dialog box

Then click OK.


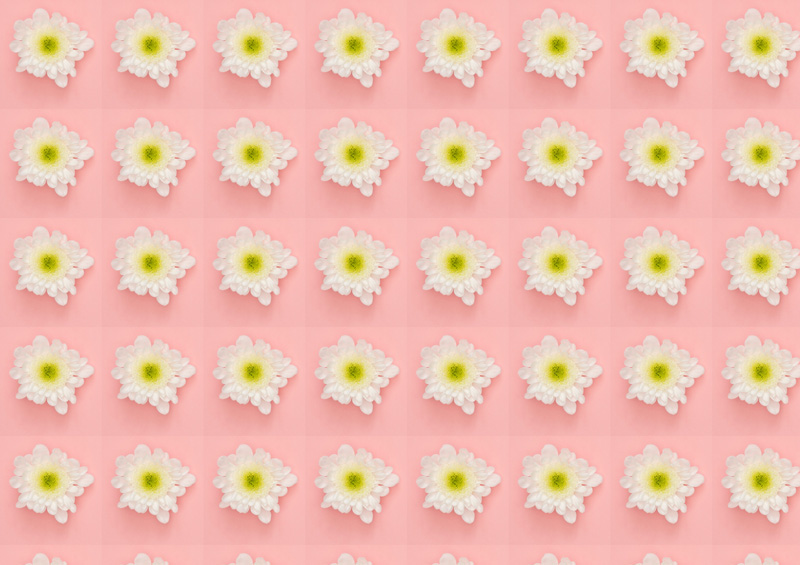
Step 6: Final output

Pattern filled in photoshop

Related Topics:


How to create custom pattern in Photoshop

As we know, a pattern includes a repeating design or visual. So, to create a custom pattern, we need to create the small part of the pattern which will be repeated.

Step 1: Create a new document

In this case, we’ll need to create a small document for repetition. I’ll be creating 30 px by 30 px document.
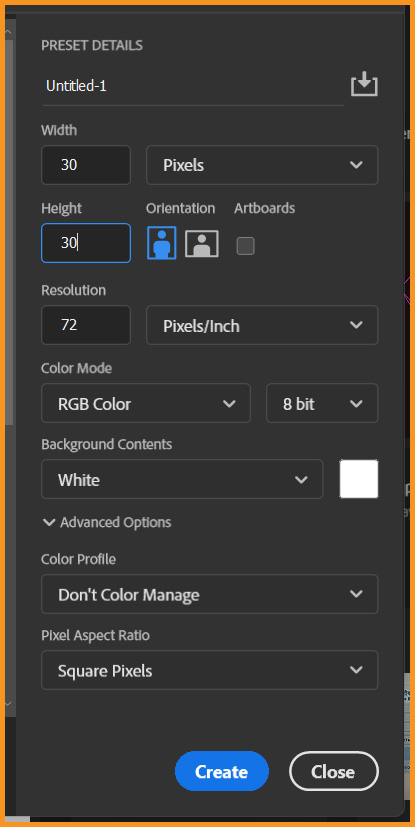
new document dialog box in photoshop
New Document dialog box

Step 2: Create your design or visual

Now, we’ll have to create the smallest part of our pattern which we need to repeat in order to create a pattern. I’ve created the following smiley.

Design to be made pattern in photoshop
Smiley to be made pattern

Step 3: Define Pattern

Go to Edit > Define Pattern again. Then rename it if needed and click OK.
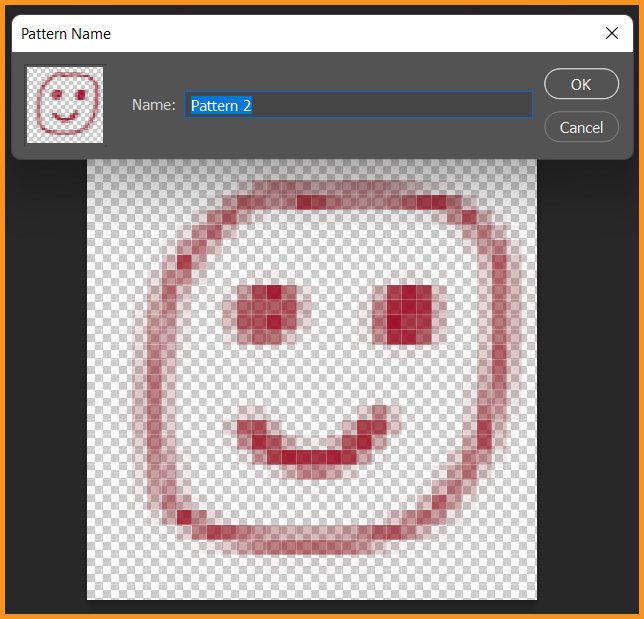
Define Pattern in photoshop
Define Pattern dialog box

Step 4: Create new document

Now, to try out the pattern, we’ll have to create a New Document.


Step 5: Go to Edit > Fill

Chose Pattern from Contents and again from Custom Pattern chose the newly defined pattern at the bottom.
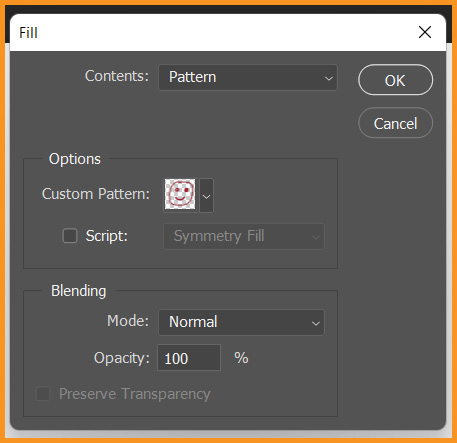
Fill dialog box in photoshop
Fill dialog box

Step 6: Final Result

Pattern filled in photoshop
Custom pattern filled in photoshop

Related Topics:

Ad

Define Brush Preset in Photoshop
Define Brush Preset in Photoshop
In this Photoshop Lesson, we’ll learn about ‘Define Brush Preset command in Photoshop‘ as well as ‘How to create Brush in Photoshop’. Define Brush Preset command is available under Edit menu in Photoshop.

My name is Lalit Adhikari and we are at LTY. Let’s begin!

Ad

Sky Replacement in Photoshop

Sky Replacement in Photoshop
In this Photoshop Lesson, we’ll learn about ‘Sky Replacement command in Photoshop‘. Sky Replacement command is available under Edit menu in Photoshop.
My name is Lalit Adhikari and we are at LTY. Let’s begin!


Related Topics:


Introduction

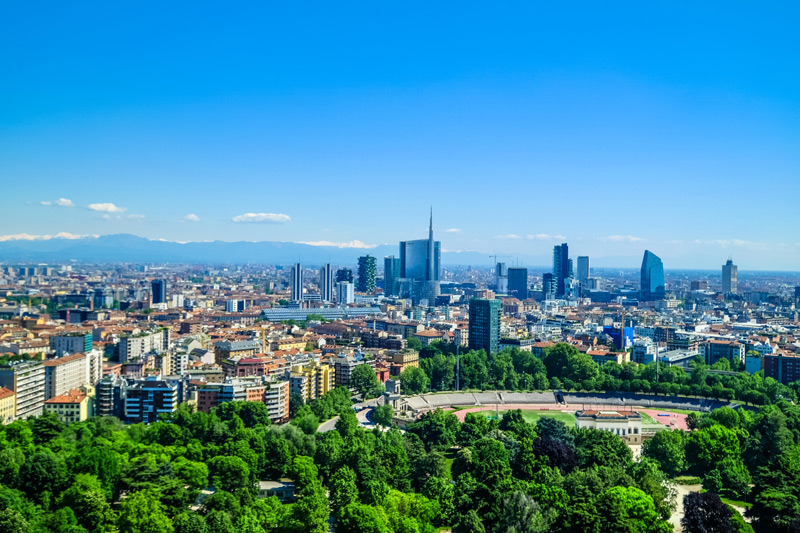
In case of outdoor photography, photographers have to plan a lot of things, study weather apps, track sun movement and get at the location early to get the best light.

But sometimes, no matter how much we plan, we are not at the right place, at the right time, for the right light. As a result, the sky in our frame may appear to be blank and boring.

In this Photoshop Lesson, we will learn how to use the Sky Replacement feature in Photoshop. This could also be used while creating a composition in Photoshop for Manipulation or Matte Painting.
Sky Replacement feature was introduced in October 2020 in version 22.0. Then it was updated in August 2021 in version 22.5.

A before and after comparison for Sky Replacement feature.


Related Topics:


When we should Replace Sky

If we are creating a Manipulation or Matte Paint or an artistic photograph then we’ve no reason to not to replace sky to make our composition better.


When we should not to use Sky Replacement

In certain photography genres like Photojournalism and Travel Photography, the authentic experiences are valued more. So, it’s recommended not to replace sky in cases where authentic experiences matter.


Related Topics:


How to use Sky Replacement in Photoshop
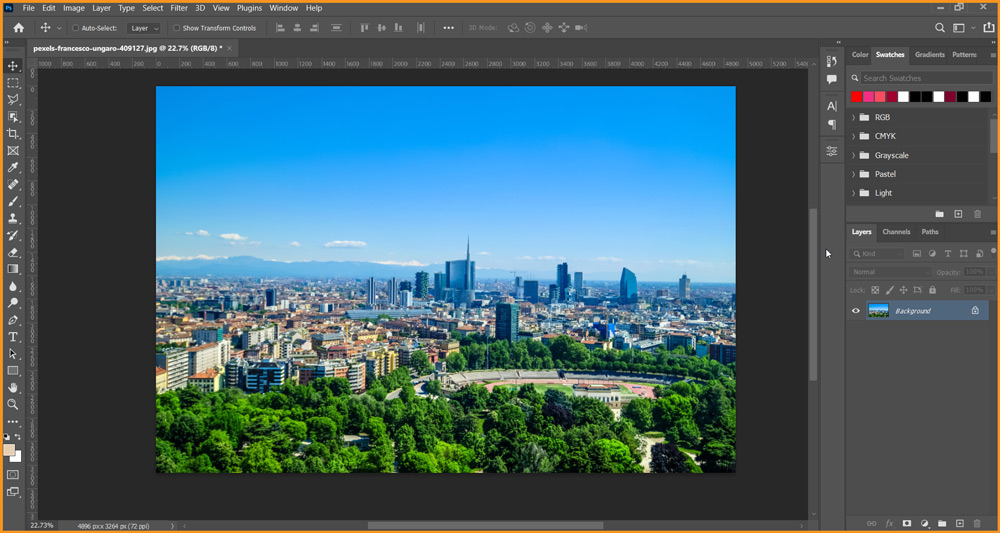
For this tutorial, I’ve chosen the following image.

  • Open image in Photoshop.
Image opened in Photoshop
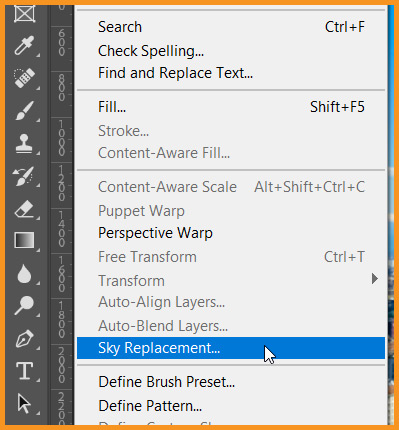
  • Go to Edit > Sky Replacement…

If this option is muted (grayed out) please select the layer in the Layer Panel and try again.

Sky Replacement under Edit menu in photoshop
Sky Replacement feature under Edit menu
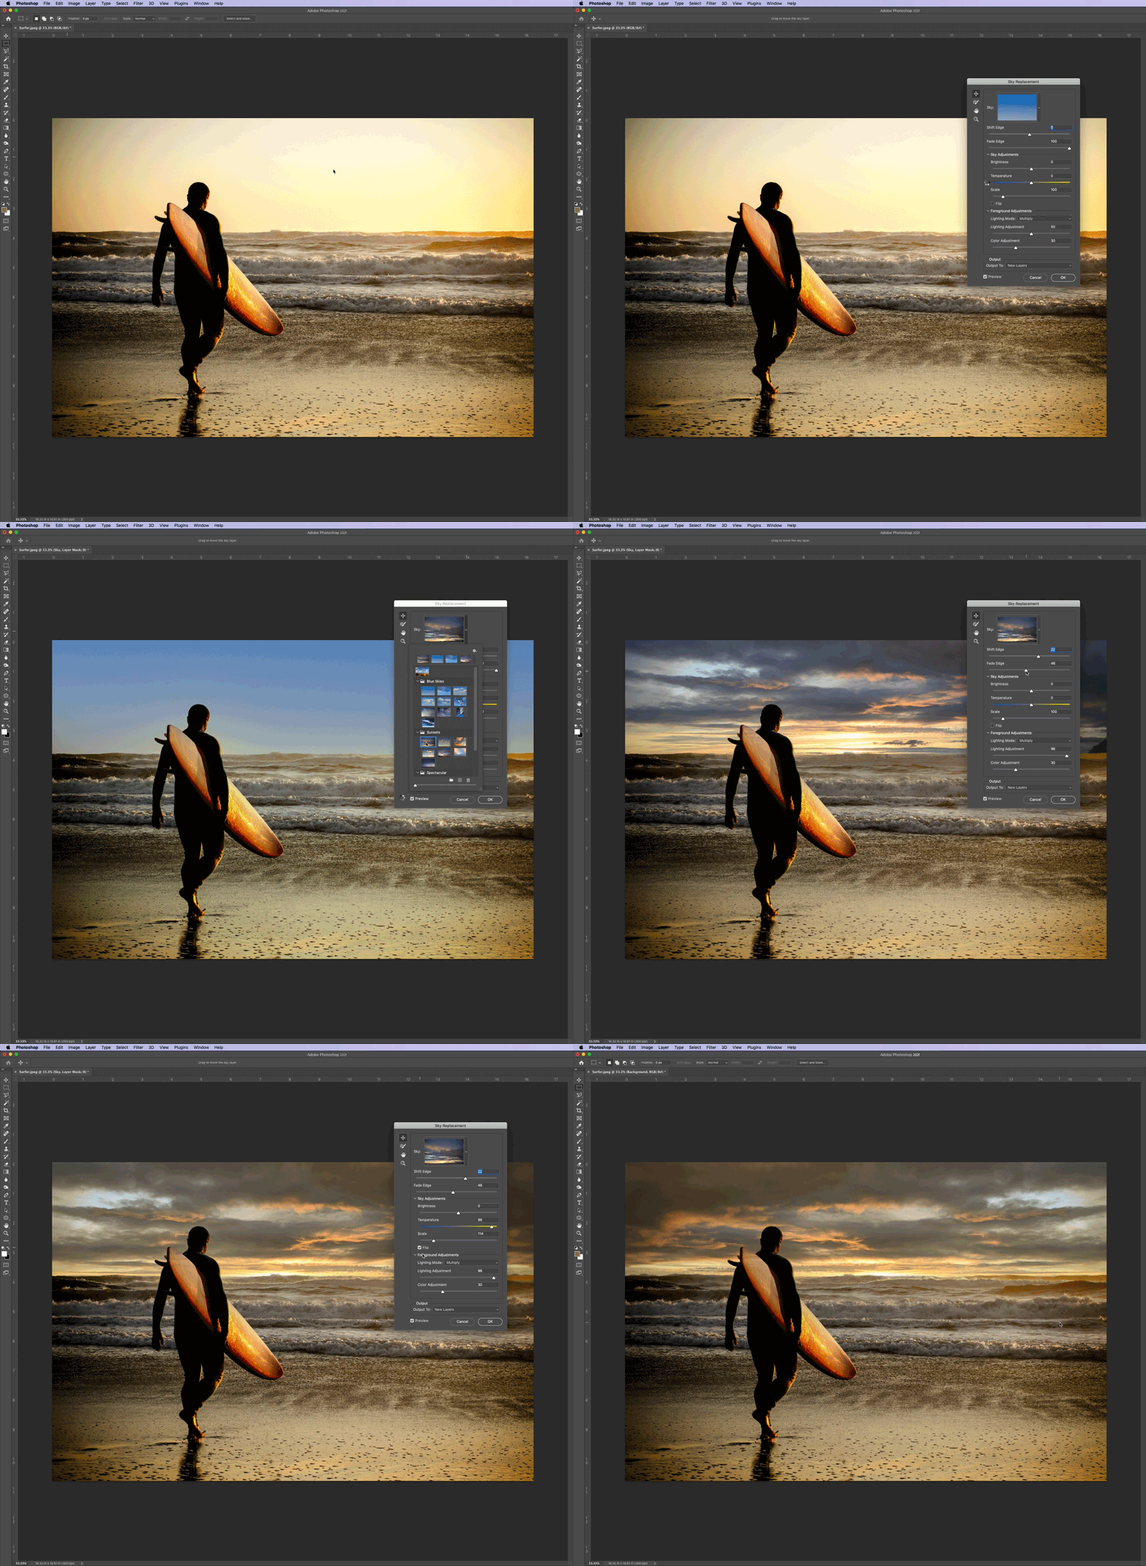
  • Sky Replacement Panel will appear
Sky Replacement Panel

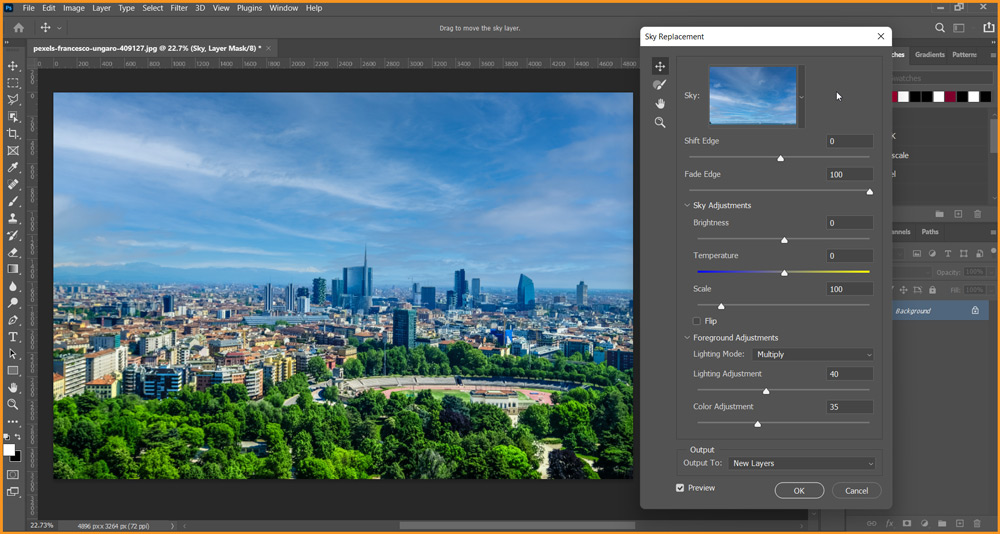
By default, a new sky will be applied to our image with preview option checked in the Sky Replacement Panel.

Sky Replacement in Photoshop
Related Topics:


Sky Replacement Panel

Through our Sky Replacement Panel we can change and modify settings for Sky Replacement feature.

Sky

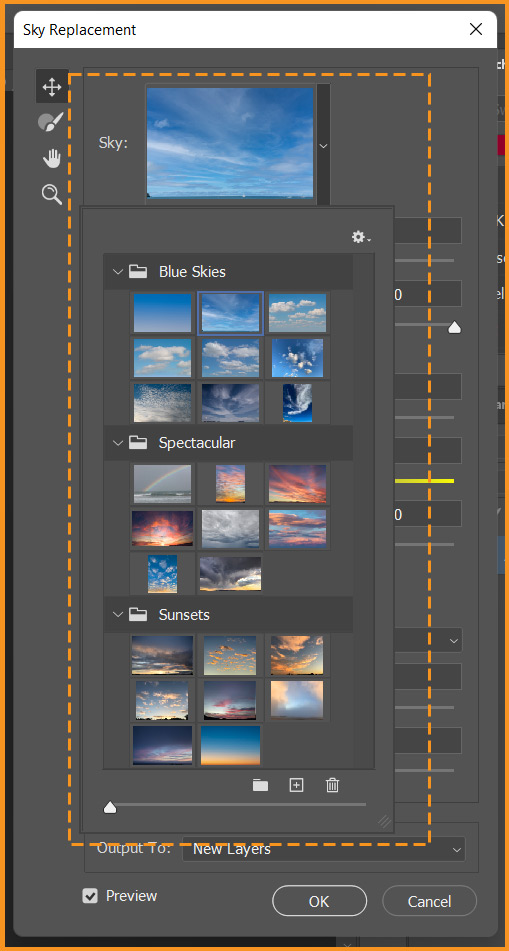
Photoshop provides us with a library of Sky images to choose. They are organized under three folders named as Blue Skies, Spectacular and Sunsets.

Sky option in Sky Replacement dialog box

As we click on the Skies, the preview will automatically get updated.

Also, pay attention to the light and shadow direction in the image. We should try to match the sun placement in the new sky with the direction of light in our image.

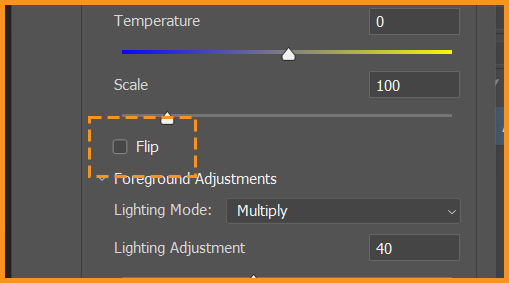
There’s also an option to flip the sky, if needed, as shown below.

Flip option in Sky Replacement dialog box
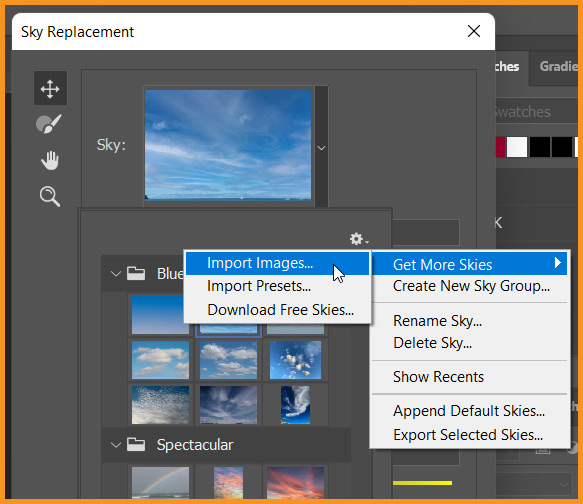
  • To place our own image as sky we’ve to click on the settings icon then Import Images under Get More Skies option as shown below.
Import images option in Sky Replacement dialog box
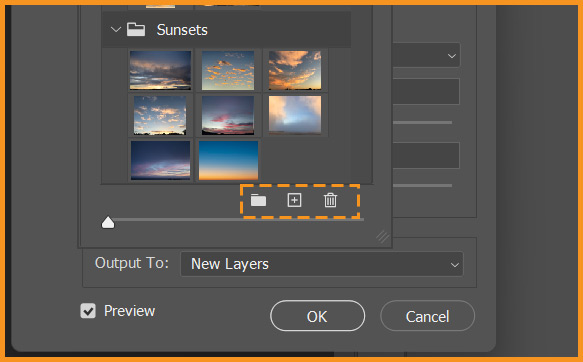
  • We can also create a new folder and add new image outside of all the folders and Delete any of the available or imported sky from the folders using the buttons at the bottom of the Sky Panel.
Folder, Add new sky and Delete option in Sky Replacement dialog box
Create Folder, Add new sky and Delete options

Related Topics:


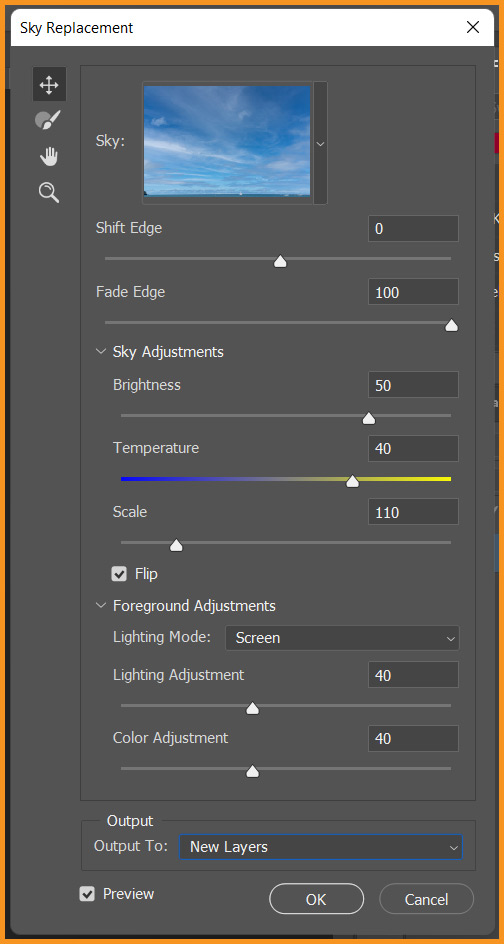
The Sky Replacement workspace also have following options:

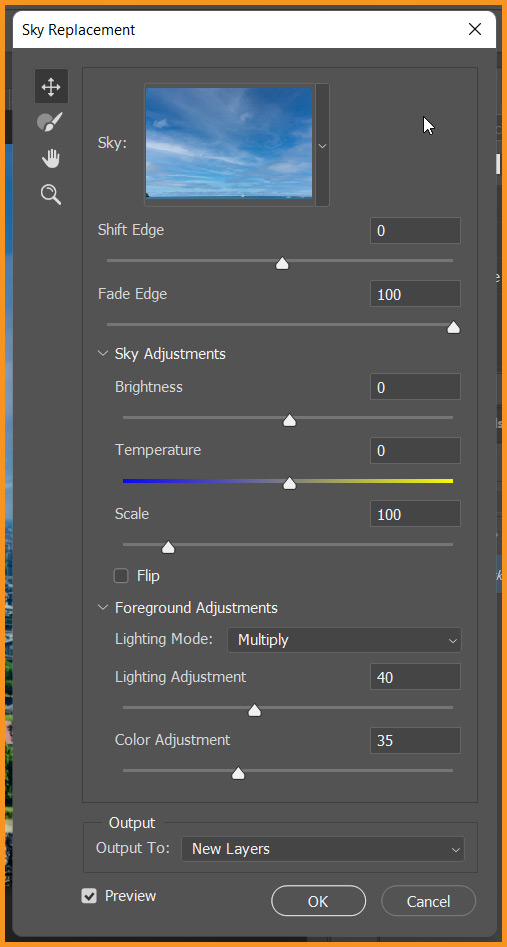
  • Shift Edge: It determines where the border between the sky and the original image begins.
  • Fade Edge: It sets the amount of fading or feathering from the sky image to the original photo along the edges
  • Brightness: It adjusts the brightness of the sky.
  • Temperature: It adjusts the temperature of the sky warmer or cooler.
  • Scale: It resizes the sky image.
  • Flip: As already discussed, it flips the sky image horizontally.
  • Lighting mode: It determines the blending mode used for lighting adjustments.
  • Foreground Lighting: It is used to set the contrast for foreground; a setting of zero will not make any adjustments.
  • Edge Lighting: It is a slider to control the lighting adjustments applied to the object edges in your sky images; a setting of zero will not make any adjustments.
  • Color Adjustment: It is a opacity slider that determines how strongly the foreground is harmonized with the sky colors – a setting of zero will not make any adjustments.
  • Output: This allows you to select whether the changes to the image are placed on New Layers (named Sky Replacement Group) or a Duplicate Layer (single flattened layer).

For this tutorial image, I’ve chosen the following values:

Sky Replacement in photoshop
Sky Replacement dialog box

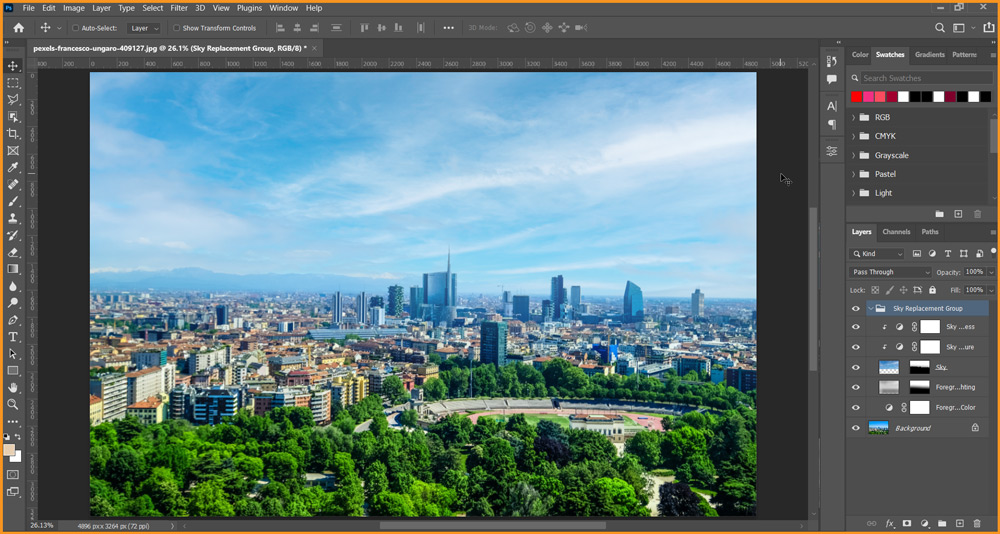
The final output in the Photoshop interface appears as shown below.

Sky Replacement applied in photoshop

Related Topics:


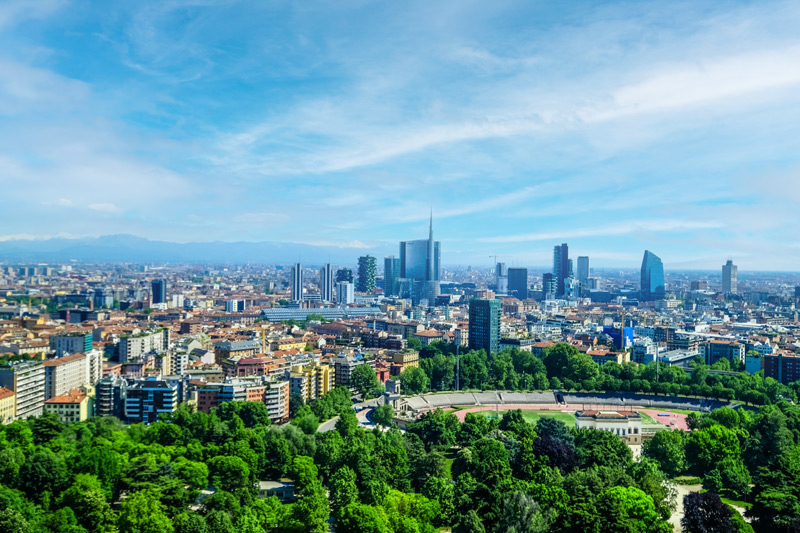
Final result

final result after sky replacement in photoshop

Related Topics:


Ad

Auto-Blend Layers in Photoshop

Auto-blend layers in Photoshop

In this Photoshop Lesson, we’ll learn about ‘Auto-Blend Layers command in Photoshop‘. Auto-Blend Layers command is available under Edit menu in Photoshop.

My name is Lalit Adhikari and we are at LTY. Let’s begin!


Related Topics:


Auto-Blend Layers

We can use the Auto-Blend Layers command to stitch or combine images with smooth transitions in the final composition. It will create either a Panoramic image or a blending composite.

Auto-Blend Layers command applies layer masks as needed to each layer to mask out over or underexposed areas or content differences to create a seamless composite.

Auto-Blend layers command is available only for RGB or Grayscale images. It does not work with Smart Objects, video layers, 3D layers or background layers.

Among all the various uses of the Auto-Blend Layers command, we can use it to blend multiple images of a scene with different areas in focus to achieve a composite image with an extended depth of field.

Similarly, we can use it to create a composite by blending multiple images of a scene with different illuminations.

In addition to combining images of a scene, we can stitch together images into a panorama. Although, it is recommended to use the Auto-Align Layers command first, to produce panoramas from multiple images.


Related Topics:


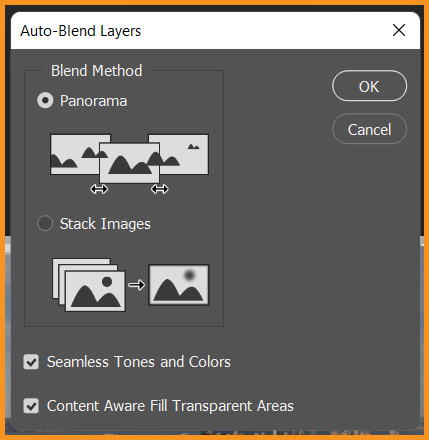
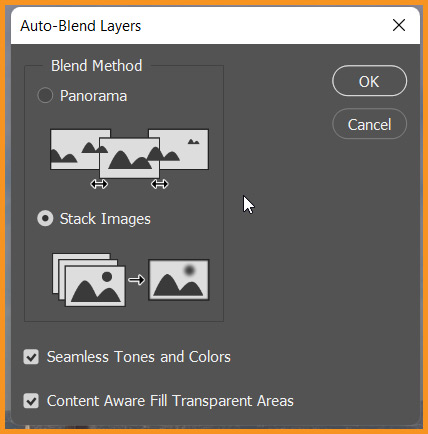
Auto-Blend Layers dialog box

Auto-Blend Layers dialog box in photoshop
Auto-Blend Layers dialog box

In the Blend Methods, we have two options:

  • Panorama: To create Panoramic images.
  • Stack Images: To create composite image by applying layer mask to each layer to mask out over or under-exposed areas or content-differences.

Then, we have 2 checkboxes which are self-explanatory by their names.

  • Seamless Tones and Colors
  • Content Aware Fill Transparent Areas

Related Topics:


Panorama Blend Method

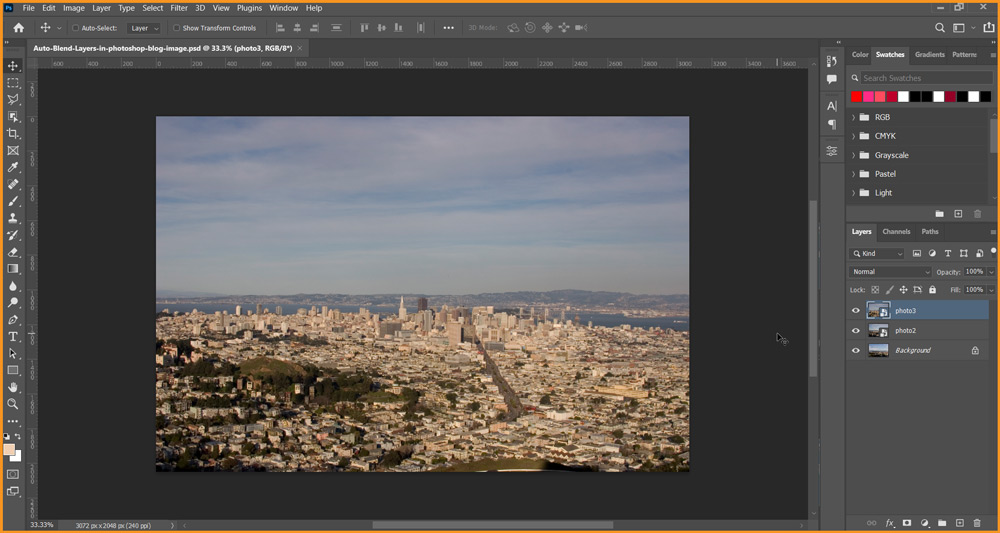
Let’s create a Panoramic image using the following images:

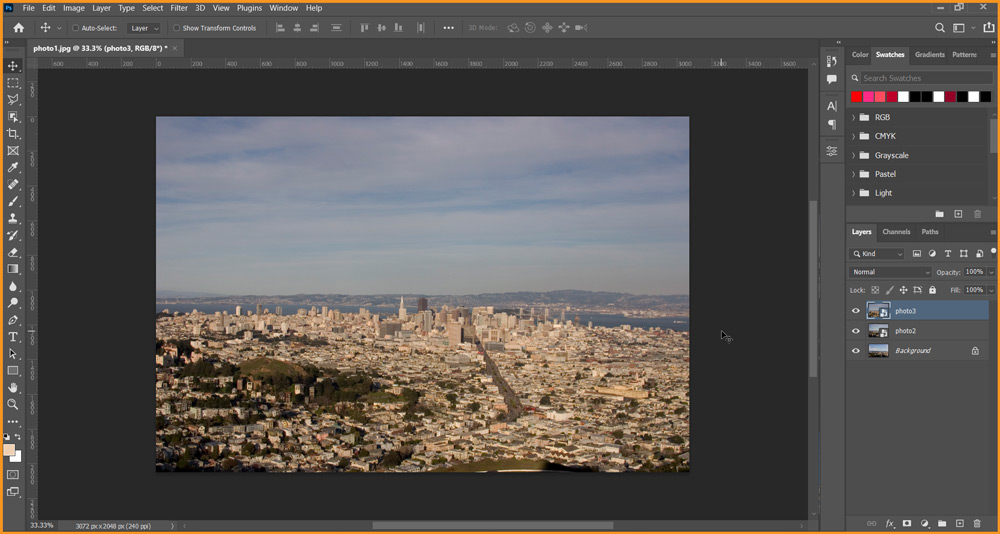
I’ve also used these images in our Photoshop Lesson on, ‘Auto-Align layers in Photoshop‘. Here, I’ve opened the first image in Photoshop and then placed the other 2 images in the same document.

Images opened and placed in Photoshop document
Images opened and placed in Photoshop
Now, to advance further, we need to unlock Background layer and Rasterize other layers.

Images arranged in Photoshop document
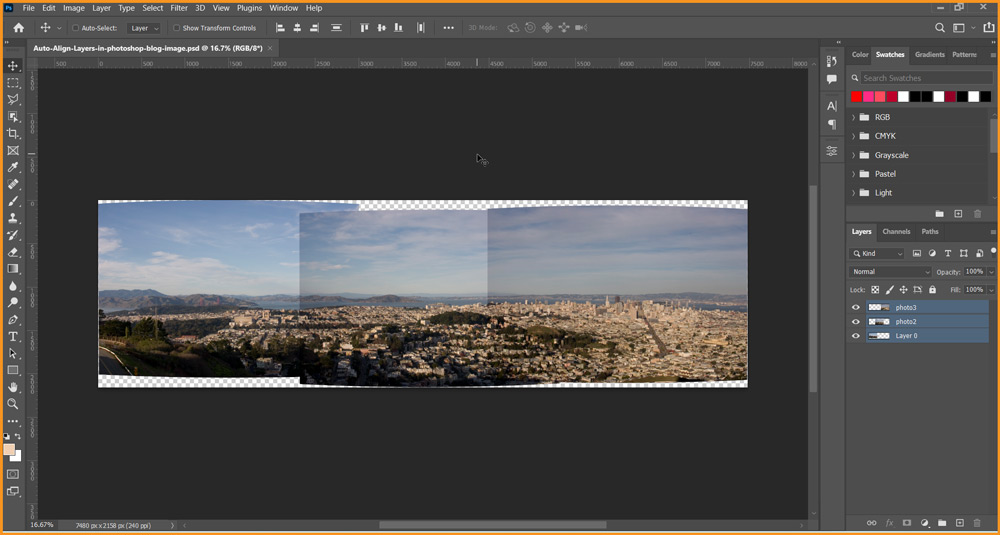
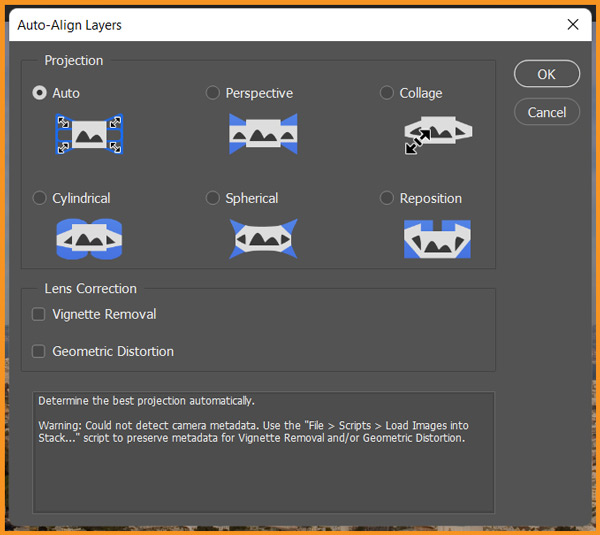
To align images for Panorama, first, we have to use Auto-Align Layers command in Photoshop. Go to Edit > Auto-Align Layers… with following values.

Auto-Align Layers dialog box

Then click OK

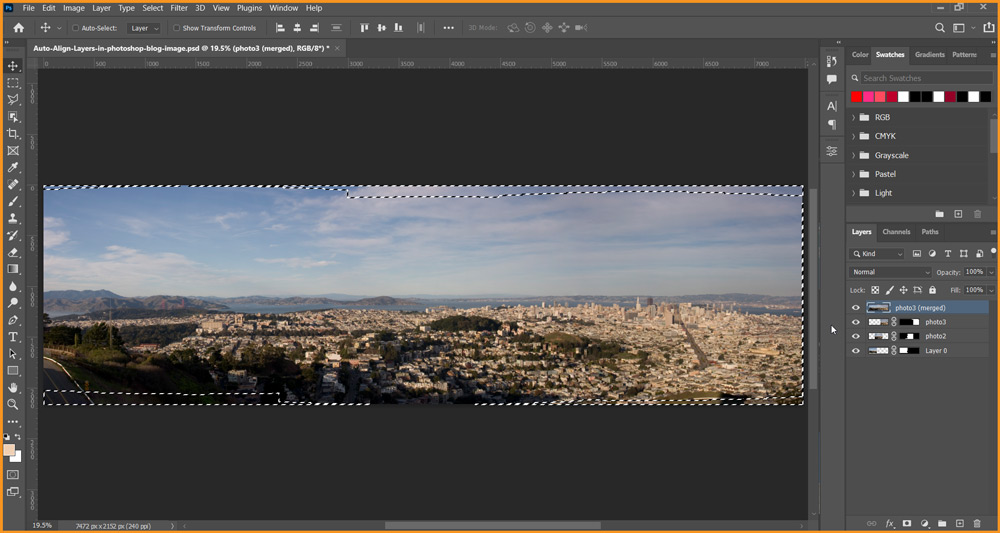
Images aligned for Panorama after Auto-Align Layers command in Photoshop
Images aligned for Panorama after Auto-Align Layers command

Now, we have to apply Auto-Blend Layers command. Go to Edit > Auto-Blend Layers… with following values.

Auto-Blend Layers dialog box

Click OK. The final result is shown below:

Panoramic image created in photoshop
Related Topics:


Stack Images Blend Method

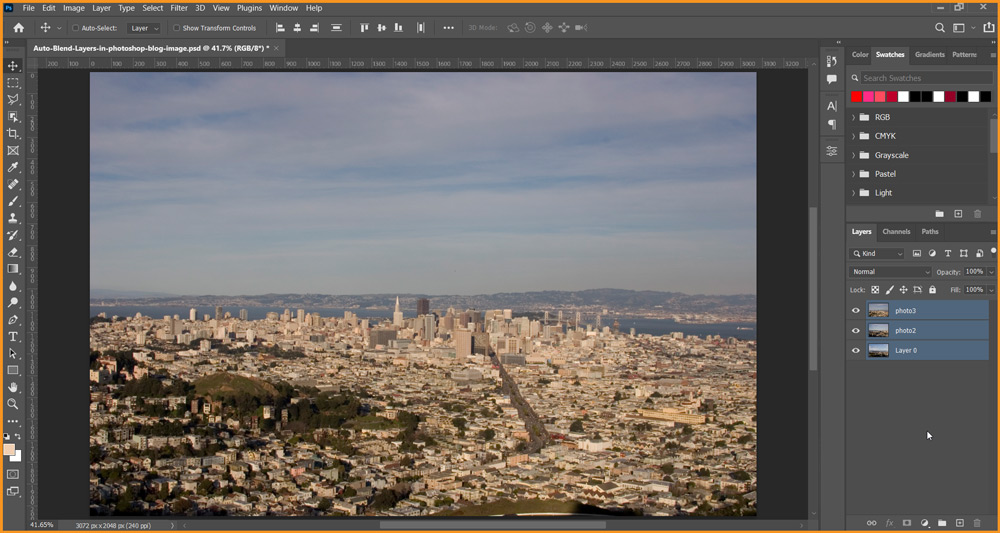
I’ll again use the images mentioned above but this time, I’ll not use Auto-Align Layers command. Instead use Auto-Blend Layers after unlocking and Rasterizing layers with Blending Method set to Stack Images.

Images in Photoshop document
Images arranged in Photoshop document
Now, go to Edit > Auto-Blend Layers…

Auto-Blend Layers dialog box

Click OK. The final result will look as shown below:

Final result after stack images blending method
Final result

Related Topics:


Ad

Auto-Align layers in Photoshop

Auto-Align Layers in photoshop

In this Photoshop Lesson, we’ll learn about ‘Auto-Align Layers command in Photoshop‘. Auto-Align Layers command is available under Edit menu in Photoshop.

My name is Lalit Adhikari and we are at LTY. Let’s begin!


Related Topics:


Auto-Align Layers

The Auto-Align Layers command under Edit menu in Photoshop can automatically align layers based on similar content in different layers, such as corners and edges.

We assign one layer as a reference layer or let Photoshop automatically choose the reference layer. Other layers are aligned to the reference layer so that matching content overlays itself.

Hence, it is used frequently for creating panoramic images.


Tutorial Images


Related Topics:


How to use Auto-Align Layers

To show the use of Auto-Align Layers command, I’ll be creating a panoramic image using the three images mentioned above.

First, I’ll open ‘Image -1’ in photoshop. After that, I’ll place other images, ‘Image – 2’ and ‘Image – 3’ in the same document as different layers.

Images opened and placed in Photoshop document
Images opened and placed in Photoshop Document

Related Topics:


How to Create Panoramic Image in Photoshop

  • Image place after opening ‘Image – 1’ will be placed as Smart Object, we’ll need to Rasterize those layers.
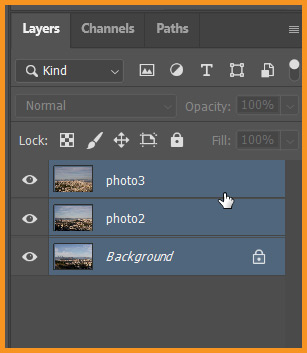
  • To create panoramic image from the above opened images, we have to select all the layers in the layer panel.
All layers selected in layers panel in photoshop
All layers selected
  • Go to Edit > Auto-Align Layers…
Auto-Align Layers dialog box

Different options available in Auto-Align Layers dialog box are as follow:

  • Auto: In this method, Photoshop analyzes the source images and applies either a Perspective or Cylindrical layout, depending on which produces a better composite.
  • Perspective: It creates a consistent composition by designating one of the source images (by default, the middle image) as the reference image. The other images are then transformed (repositioned, stretched or skewed, as necessary) so that overlapping content across layers is matched.
  • Cylindrical: It reduces the “bow-tie” distortion that can occur with the Perspective layout by displaying individual images as on an unfolded cylinder. Overlapping content across layers is still matched. The reference image is placed at the center. Best suited for creating wide panoramas.
  • Spherical: It aligns the images with wide fields of view (vertical and horizontal). Designates one of the sources images (the middle image, by default) as the reference image and spherically transforms the other images so that overlapping content is matched.
  • Scene Collage: It aligns layers and matches overlapping content, without changing the shape of the objects in the image (for example, a circle will still be a circle).
  • Reposition Only: It aligns the layers and matches overlapping content but does not transform (stretch or skew) any of the source layers.

Two options for Lens Corrections are also available:

  • Vignette Removal: Compensates for a lens defect that causes the edges, especially the corners, of an image to be darker than the center.
  • Geometric Distortion: Compensates for barrel, pincushion, or fisheye distortion.

  • In this case, Auto value under Projection will give the best result. Though if your images have any of the visible defects then other Projection values could be tested.
  • Click OK
result after auto-align layers in photoshop
Result after Auto-Align Layers in Photoshop

Here, Photoshop has arranged common content and placed images to create a possible panoramic image. We can use the Auto-Blend Layers command in Edit menu. It will blend the layers together and also fill transparent areas with Content-Aware Fill.

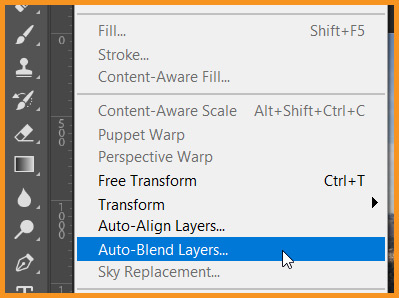
  • With all the layers still selected, go to Edit > Auto-Blend Layers
Auto-Blend Layers in Photoshop
Auto-Blend Layers under Edit menu

The following dialog box will open:

Auto-Blend layers dialog box in photoshop
Auto-Blend Layer dialog box

Here, I’ve chosen Blend Method as Panorama and also checked bottom 2 checkboxes. They will blend tones and colors as well as fill transparent areas with Content-Aware Fill.


Related Topics:


Final Result

The final screen after auto-blend layers in photoshop
Screenshot after Auto-Blend Layers in Photoshop
Final output
Final panoramic output

Related Topics:


Ad

Transform command in Photoshop

Transform command in Photoshop

In this Photoshop Lesson, we’ll learn about ‘Free Transform’, ‘Transform command in Photoshop‘. Free Transform and Transform commands are available under Edit menu in Photoshop.

My name is Lalit Adhikari and we are at LTY. Let’s begin!


Related Topics:


Free Transform

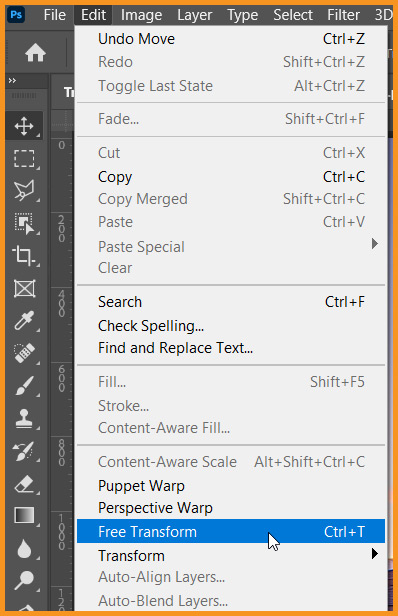
Free Transform command under Edit menu in Photoshop
Free Transform command under Edit menu

Free Transform command in Photoshop helps to scale and rotate images or text. Since updated in Photoshop 21.0 which was released in November 2019, transforming any layer type by dragging corner handle will scale the layer proportionally by default.

Option Bar of Free Transform in Photoshop
Chain icon denoting Maintains Aspect Ratio property of Free Transform

As shown in the image above, it is denoted by a chain icon in option bar of Free Transform in Photoshop. Simply click and break this chain to not letting Photoshop maintain aspect ratio automatically.


Related Topics:


Example

I have chosen following images for this tutorial:

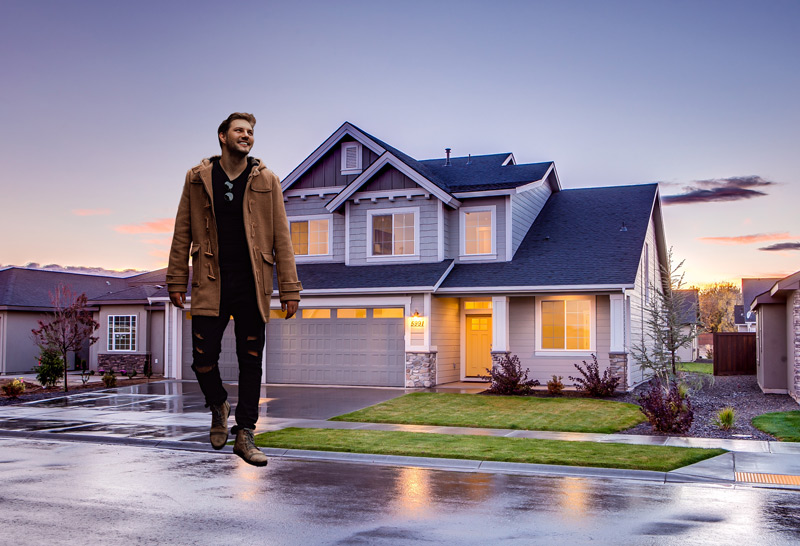
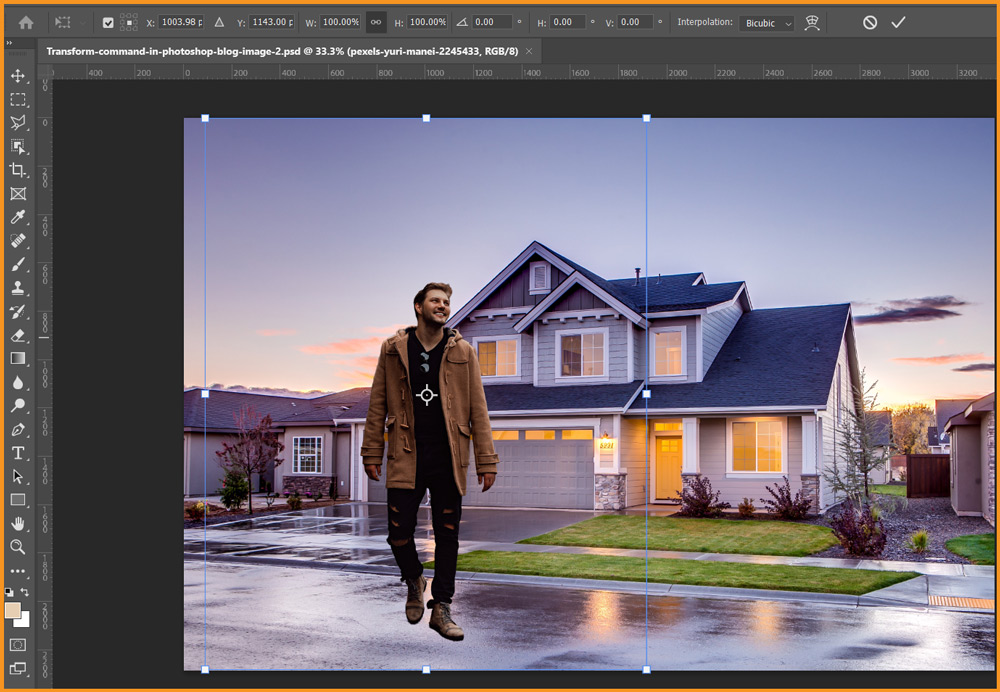
I’ve opened the ‘House’ image in the photoshop then placed the image of man in the document. Removed the background from the man image. It looks like as shown below:

man image placed on other image
After removing background from man image
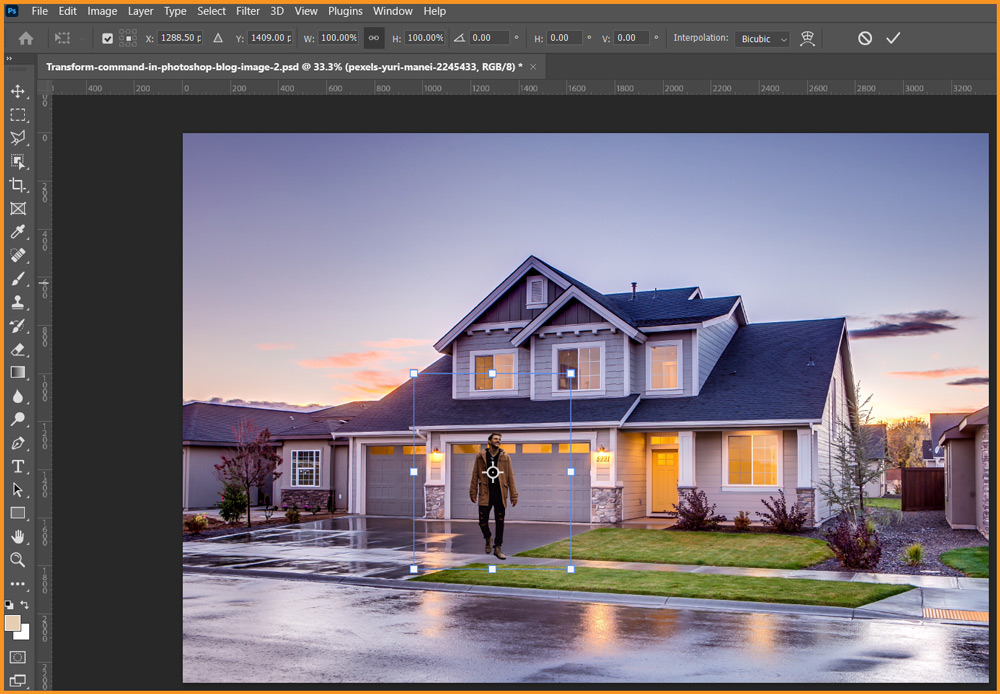
  • Go to Edit > Free Transform
Free Transform applied to image in photoshop
Free Transform command applied

To reduce the size of the man, I’ll click and drag the bounding box from top right corner and move him to the back as shown below.

size of image reduced
down-scaled the man image

Related Topics:


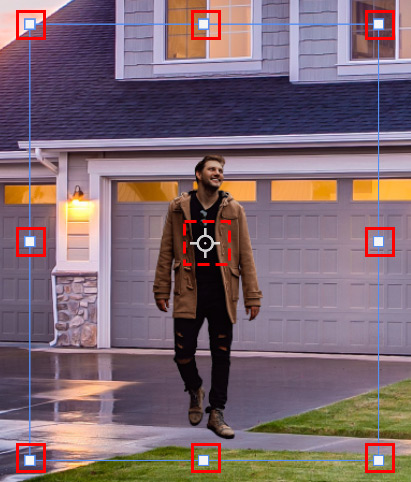
Bounding Box of Free Transform

Bounding box and Reference Point of Free Transform
Bounding Box and Reference point (dash lines)

Related Topics:


Option bar with Free Transform

Option bar with Free Transform in Photoshop
Options for Free Transform

Option bar has many useful options with Free Transform. Most of these are self-explanatory.


Reference Point

Reference Point location for Free Transform in Photoshop
Reference Point Location

It is used to define Reference Point for any transformation to be done.


Position

Position coordinates
Position

It is used to define the position in X- and Y-axis.


Size

Size
Width and Height input boxes

It is used to define the size change in percentage. The center chain icon represents that it maintains aspect ration. We can click on the icon to break the chain.


Rotation

Rotation
Rotation

It is used to rotate the image to any numeric value.


Skew

Skew
Skew options

It is used to skew the image to any certain numeric values.


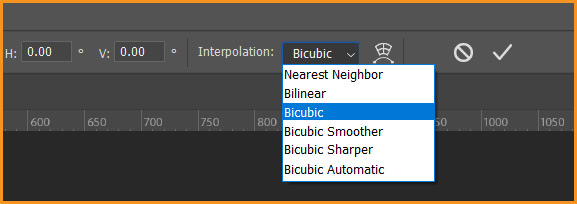
Interpolation

Interpolation
Interpolation method

It is used to define the Interpolation method for the process of Transformation. These methods have been defined in detail in our Photoshop Lesson on, ‘How to enlarge an image in Photoshop‘.


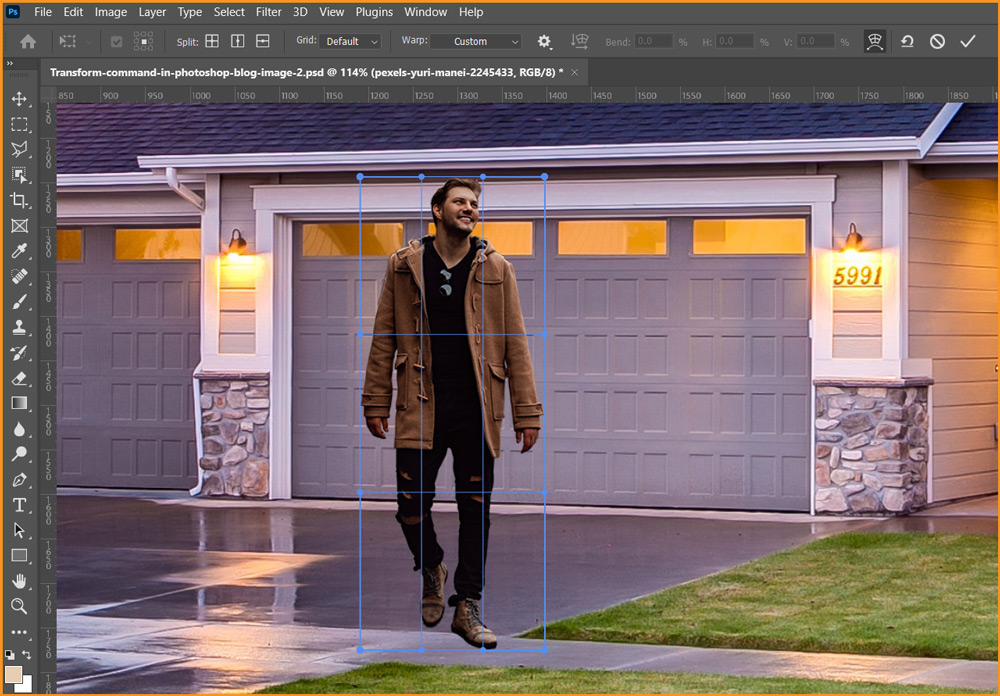
Warp mode

Warp modes
Warp modes

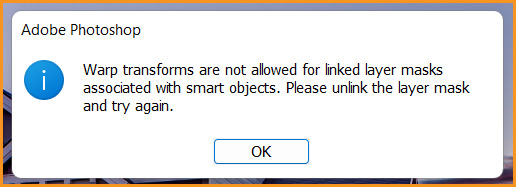
This icon is used to switch from Free Transform to Warp modes. As in our current situation, we’ve a layer with layer linked layer mask, it will show us the following error:

Warp transforms are not allowed for linked layer masks associated with smart objects.
Error message

This is due to our linked layer mask to our smart object. I’ll simply convert the whole layer to smart object again. So, the mask will be inside the new smart object. Then I’ll apply warp transform.

Warp transform applied
After switching to Warp mode

Here, we can drag the anchor points or associated handles for desired results.


Related Topics:


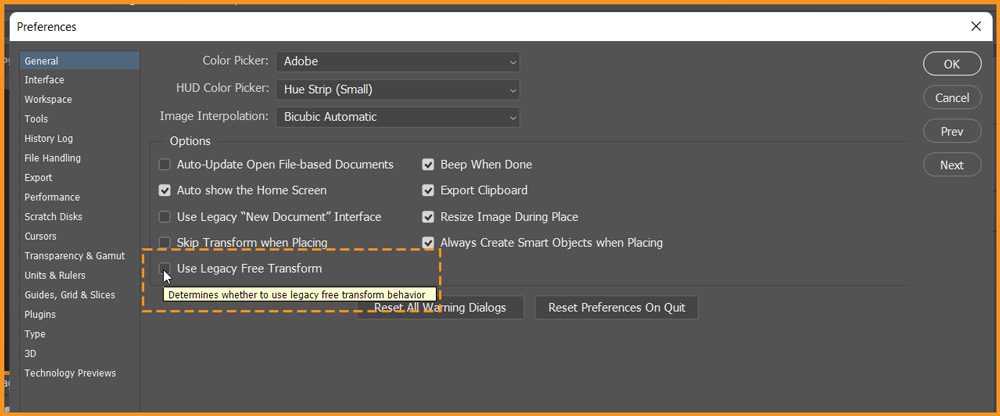
How to switch back to legacy transform behaviour

Go to Edit > Preferences > General

Then select Legacy Free Transform.

Use Legacy Free Transform option in Photoshop Preferences
Use Legacy Free Transform option in Preferences

Related Topics:


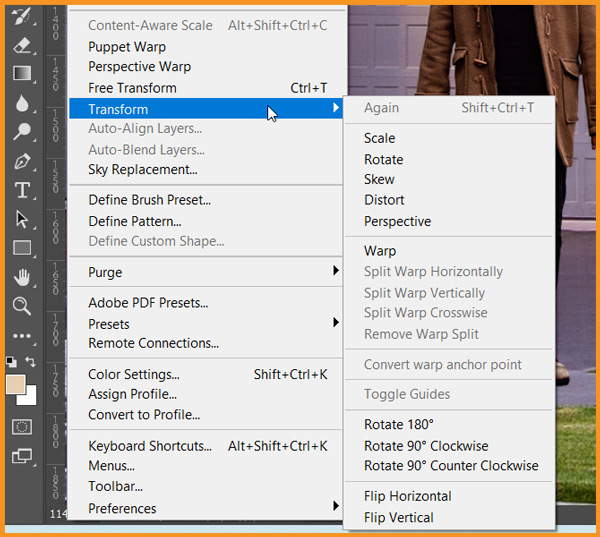
Transform

Transform command under Edit menu in Photoshop

Transform in Photoshop means to scale, shrink, enlarge, skew, distort, rotate or change the perspective of a layer, selection or shape.

We can apply transformations to a selection, an entire layer, multiple layers or a layer mask. We can also apply transformations to a path, a vector shape, a vector mask, a selection border or an alpha channel.

Remember: Transforming affects image quality when we manipulate the pixels. To apply non-destructive transformations to raster images, use Smart Objects.

Transforming a vector shape or path is always non-destructive because we’re only changing the mathematical calculations producing the object.


Related Topics:


  • Scale: Scaling refers to enlarging or reducing an item relative to its reference point. Reference point is the fixed point around which transformations are performed. We can scale horizontally, vertically or both horizontally as well as vertically.
  • Rotate: Turns an item around a reference point. By default, this point is at the center of the object; however, we can move it to another location which could be outside the item.
  • Skew: It is slanting of an item vertically and horizontally.
  • Distort: It is used to stretch an item in all directions.
  • Perspective: It is used to apply one-point perspective to an item.
  • Warp: It is used to manipulate the shape of an item.
  • Rotate 180, Rotate 90 CW, Rotate 90 CCW: It rotates the item by the specified number of degrees, either clockwise or counter-clockwise.
  • Flip: It is used to flip the item vertically or horizontally.

Related Topics:


Ad

Perspective Warp in Photoshop

Perspective Warp in Photoshop

In this Photoshop Lesson, we’ll learn about ‘Perspective Warp in Photoshop‘. Perspective Warp command is found under Edit menu in Photoshop.

My name is Lalit Adhikari and we are at LTY. Let’s begin!


Related Topics:


What is Perspective Warp

Perspective Warp in Photoshop, let us easily adjust the perspective of our images. This is particularly useful for images having straight lines or flat surfaces.

For Example: Architectural images or images of buildings.

We can also use it to composite objects having different perspectives in a single image.


Understanding Perspective Change

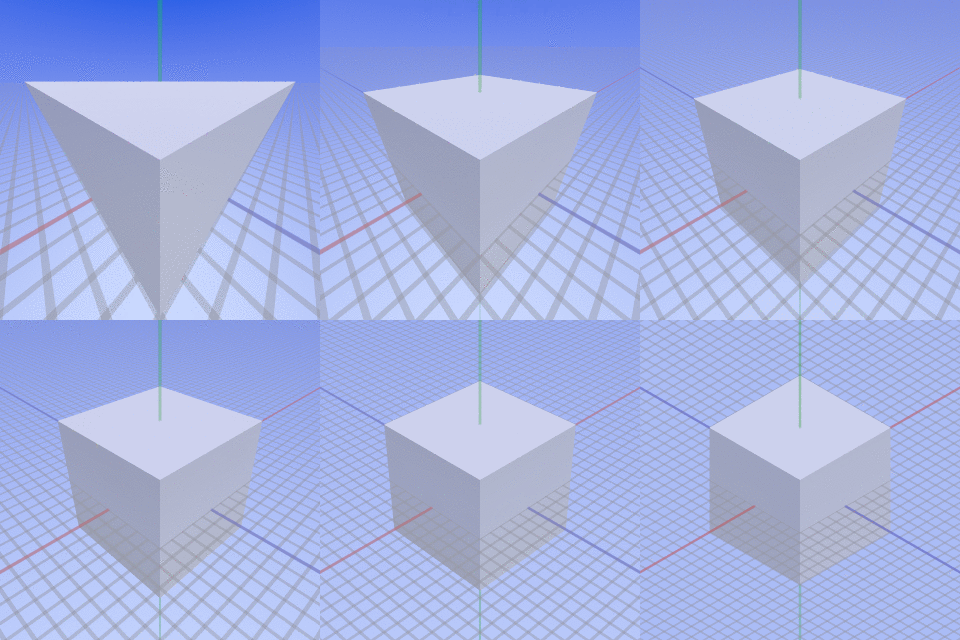
Any object will look different in an image from how that object appears in real life. This mismatch of reality and image is due to perspective distortion.

Images of a same object, when captured from different camera angles of view and distances, will exhibit different perspective distortion.

Difference in view with changing Perspective

Related Topics:


Why Perspective Warp isn’t working

Perspective Warp in Photoshop requires at least 512 MB of video RAM (VRAM) to run the perspective warp feature on 16-bit and 32-bit documents.

Before proceeding, we should ensure that our Graphics Processor is enabled in our Photoshop’s Preferences.

  • Go to Edit > Preferences > Performance
  • In the Graphics Processor Settings area, select Use Graphics Processor
  • Click Advanced Settings. Ensure that Use Graphics Processor To Accelerate Computation is selected.
  • Click OK
Performance Preferences in Photoshop

Related Topics:


How to use Perspective Warp in Photoshop

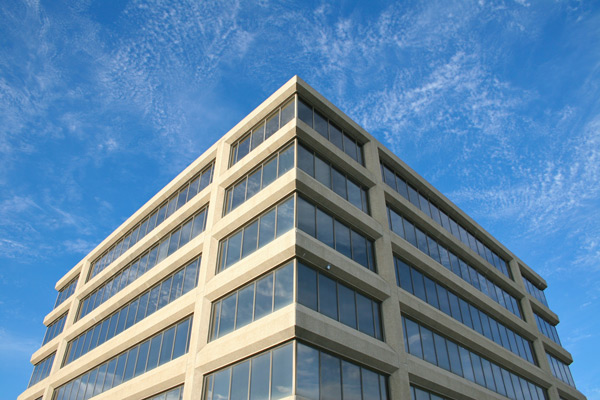
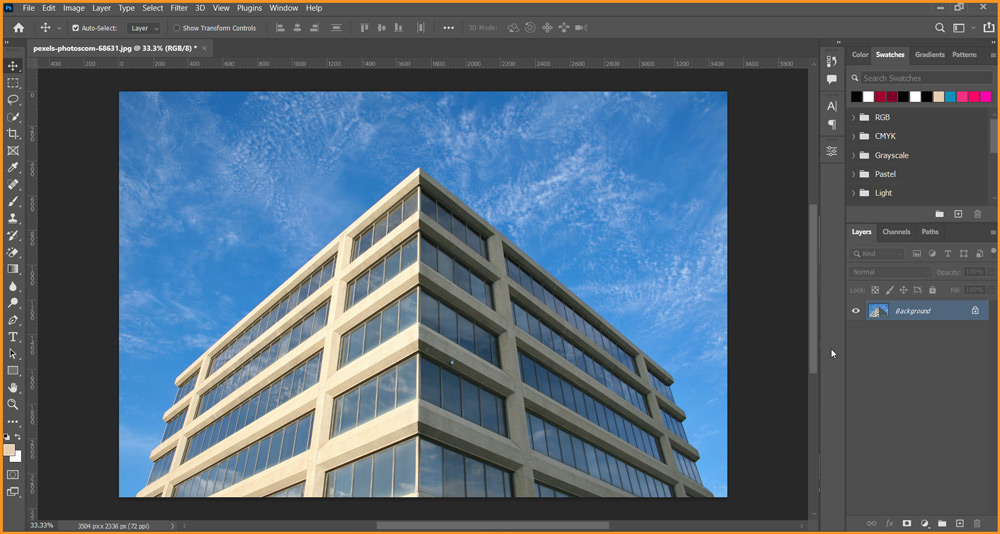
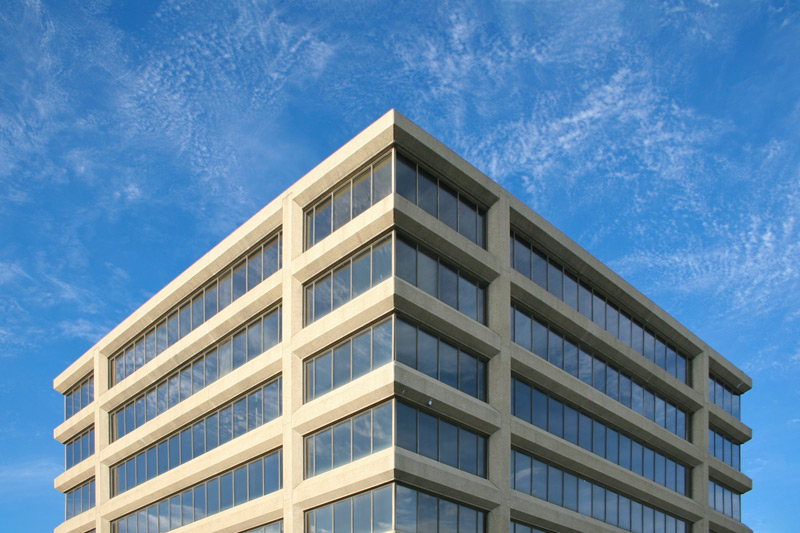
To apply Perspective Warp in Photoshop, we need to open our image in Photoshop. I’ve chosen the following image for this tutorial.

  • Open image in Photoshop.
Image opened in Photoshop
Tutorial image opened in Photoshop
  • Unlock the Background Layer.
  • Convert the layer to Smart Object.
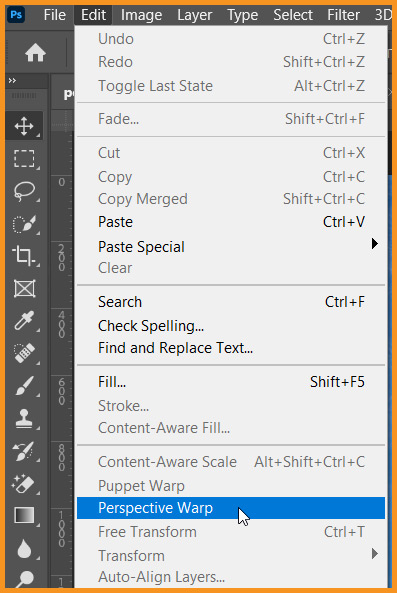
  • Go to Edit > Perspective Warp and close the Tool tip.
Perspective Warp under Edit menu in Photoshop
Perspective Warp under Edit menu
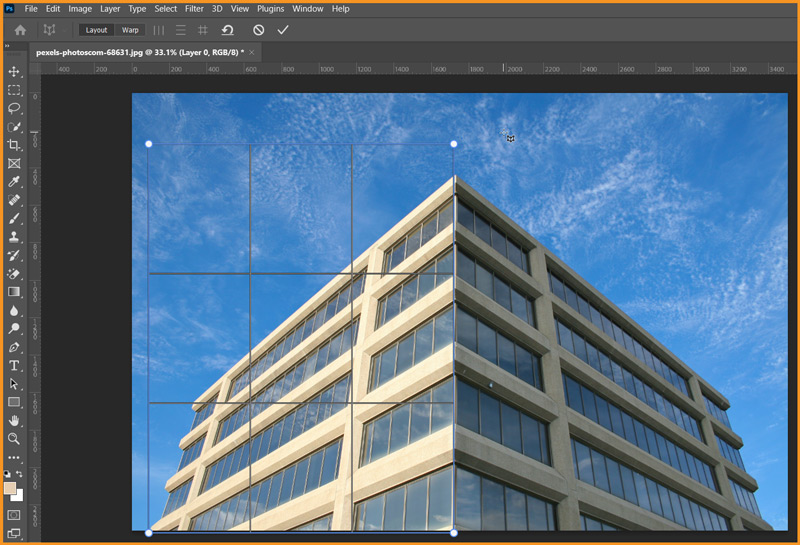
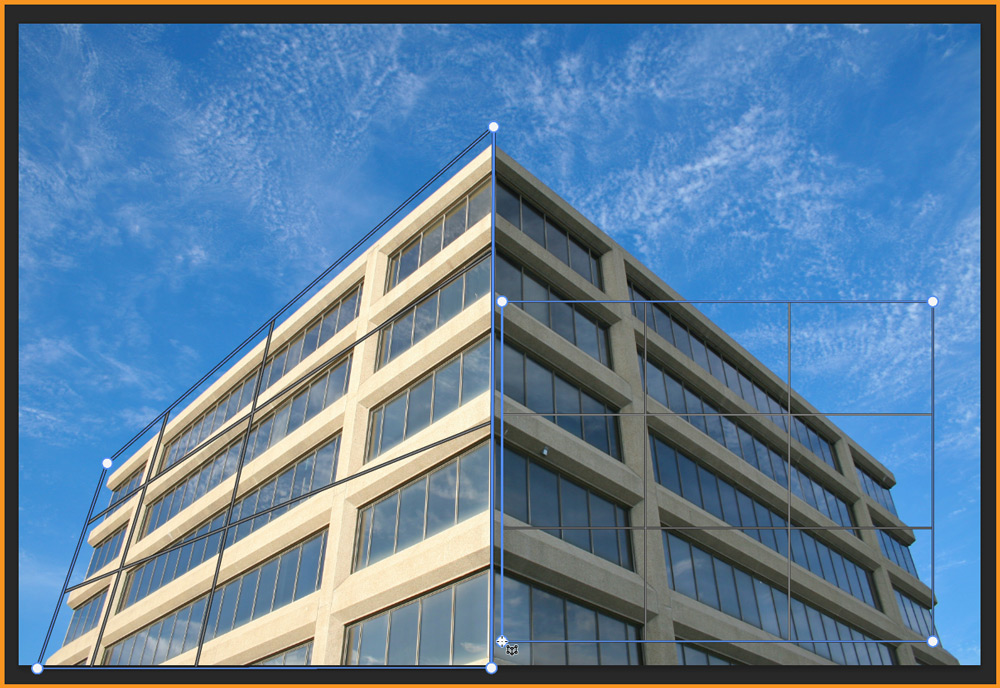
  • Draw the plane for one side of the building by clicking and dragging.
Perspective Warp Grid created in Photoshop
Perspective Warp Plane created for one side of the image.
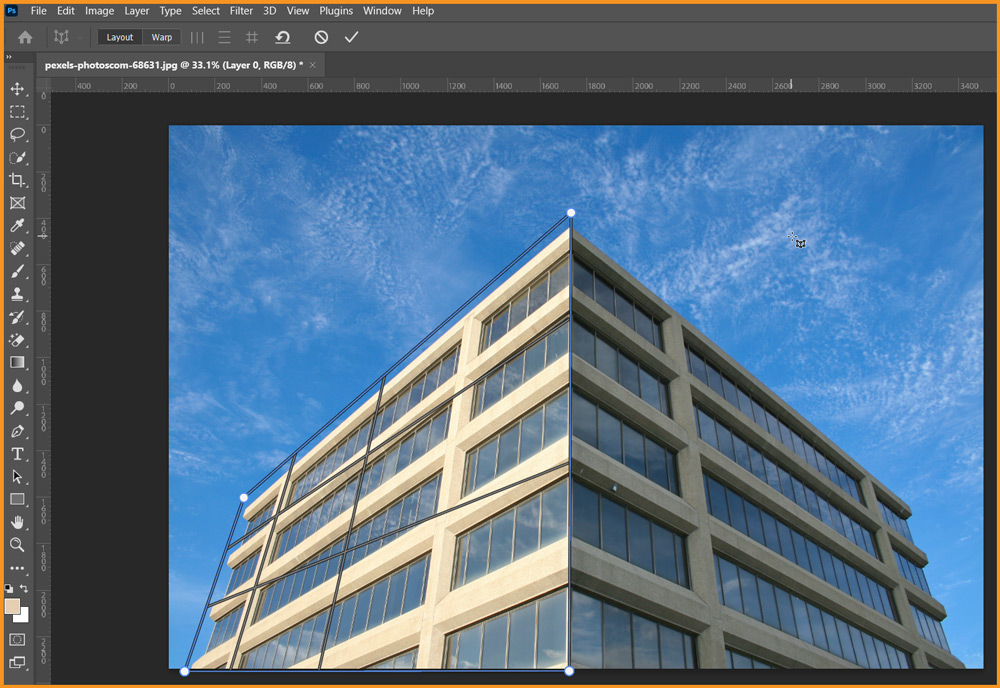
  • Adjust the plane according to the buildings perspective. To adjust the plane we need to:
    • Click on anchor points, denoted with white circles here, and move them along with the straight edge of the building.
    • After aligning them, we have to stretch the plane a little outside the building by holding Shift and dragging the plane out from center of top and left edges.
After arranging anchor points in Perspective Warp Plane
After arranging plane with anchor points
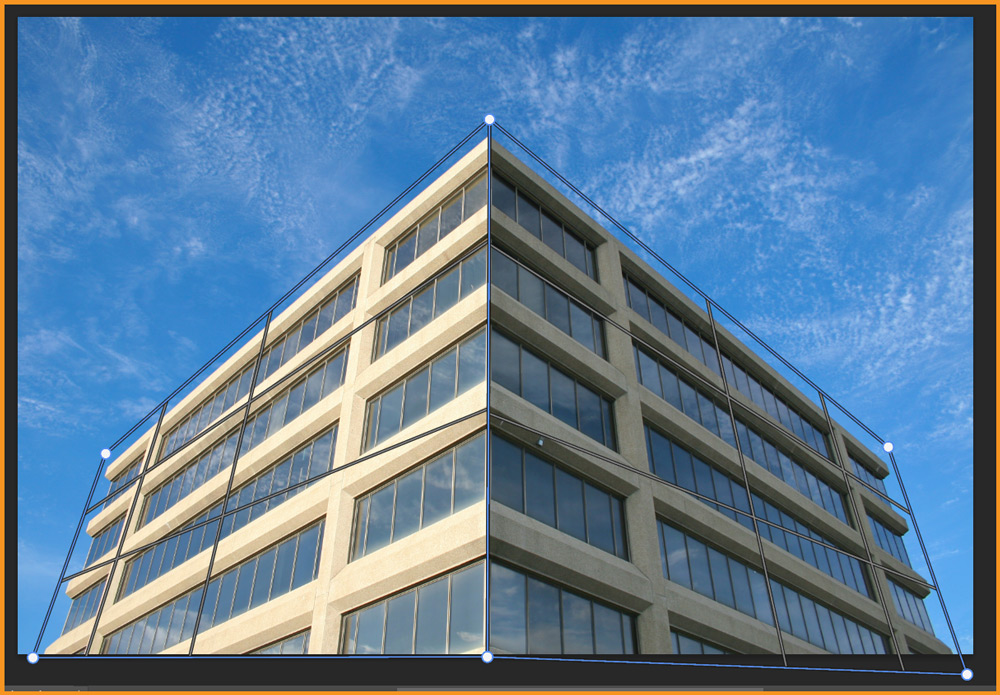
  • Now, we need to create another plane for the next half of the building.
    • Make sure to connect both planes at center.
    • While drawing next plane, when we’ll bring the left edge close to the right edge of our previous plane. They both will get highlighted. After dropping the click, they will connect.
Both edges with highlighted
Both edges highlighted

Then adjust the anchor points after conjoined planes have been created.

Planes adjusted on the image
Plane adjusted in Perspective Warp

Related Topics:


Options for Perspective Warp

Options with Perspective Warp in photoshop
Option bar with Perspective Warp

By default, Layout mode is active. Layout mode allows us to create planes and also to move and scale planes. It also allows to move anchor points.

We can click on the Warp to enable Warp mode which will enable three options available next to it. These three options are:

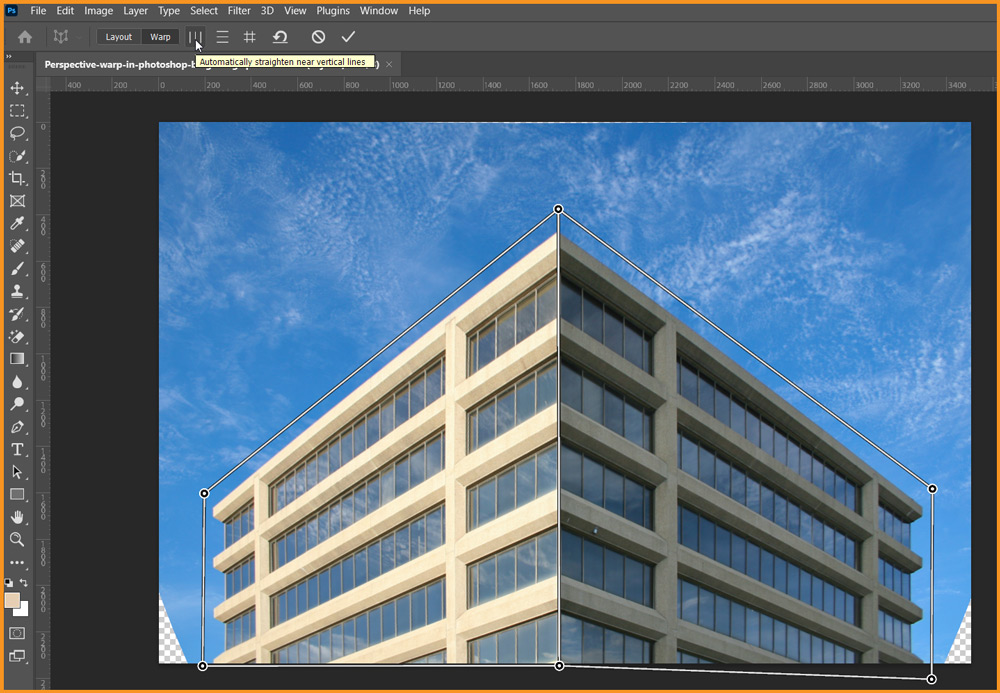
  • Automatically straighten near vertical lines
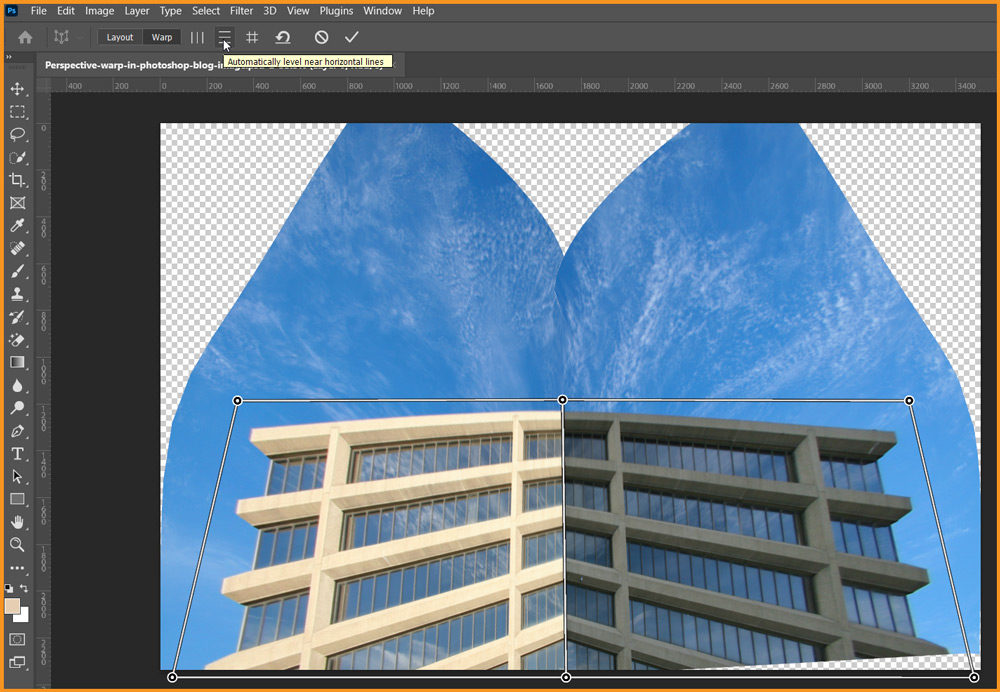
  • Automatically straighten near horizontal lines
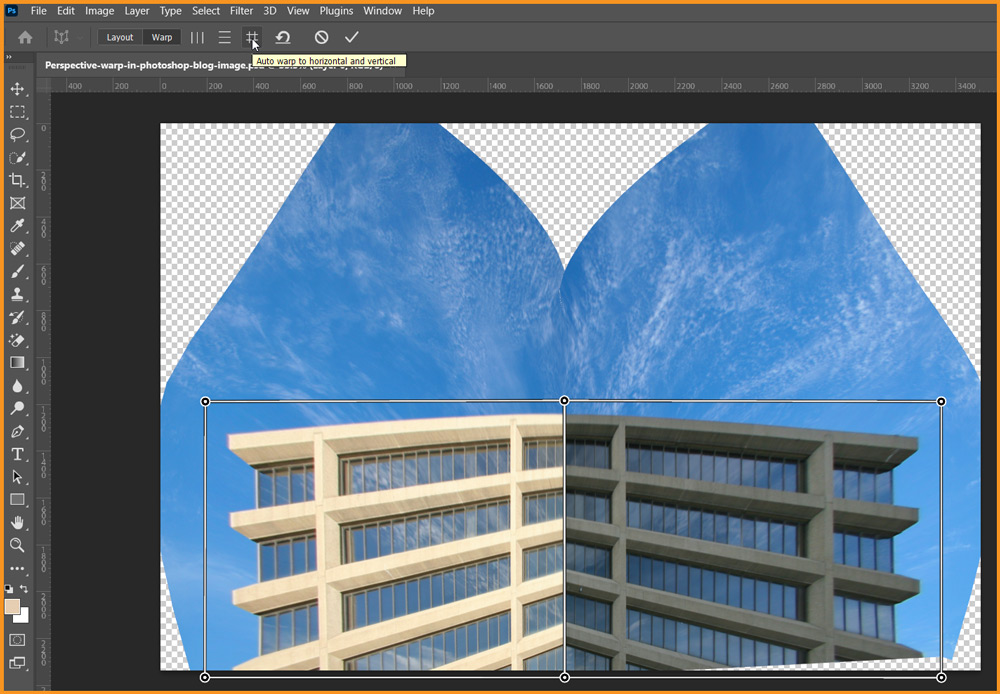
  • Auto warp to vertical and horizontal

The result of these warp options are shown below individually.


Related Topics:


Automatically straighten near vertical lines

Automatically straighten near vertical lines

This result seems to be best for our case.


Automatically straighten near horizontal lines

Automatically straighten near horizontal lines

Auto warp to vertical and horizontal

Auto warp to vertical and horizontal

Related Topics:


Final result

We can make custom anchor point adjustments too in Warp mode. In this case, I’ve chosen the Automatically straighten near vertical lines result.

It had some empty spaces which I had filled using Content-Aware Fill in Photoshop. Here’s the final result:

Final result after Perspective warp in photoshop
Final Result

Related Topics:


Ad

Puppet Warp in Photoshop

Puppet warp in photoshop

In this Photoshop Lesson, we’ll learn about ‘Puppet Warp in Photoshop‘. Puppet Warp command is found under Edit menu in Photoshop.

My name is Lalit Adhikari and we are at LTY. Let’s begin!


Related Topics:


What is Puppet Warp

Puppet Warp, as defined by Adobe, provides a visual mesh that lets us drastically distort specific image areas while leaving other areas intact.

Puppet Warp’s applications range from subtle image retouching (such as shaping hair) to total transformations (such as repositioning arms or legs).


Related Topics:


How to apply Puppet Warp

Puppet Warp could be used on image layers, layer and vector masks. To non-destructively distort images, we should use Smart Objects.

  • In the layers panel, select the layer or mask.
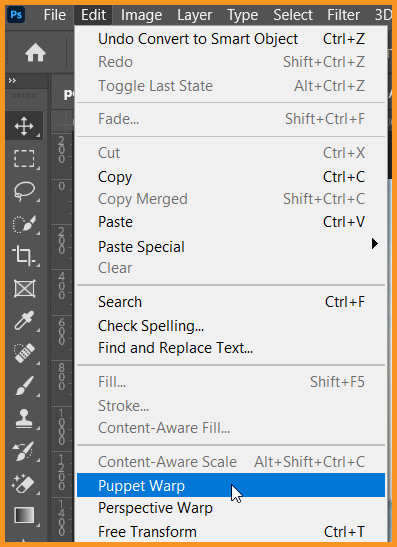
  • Go to Edit > Puppet Warp
Puppet Warp command under Edit menu in Photoshop
Puppet Warp under Edit menu

Related Topics:


Tutorial Images

I’ve selected following two images randomly, just to show the working of Puppet Warp.


Puppet Warp Options

The following different settings can be adjusted for the Puppet Warp from the option bar.

Options for Puppet Warp in Photoshop
  • Mode: This option determines the stretchiness or elasticity of the mesh created.
  • Density: This option determines the spacing of mesh points. If we’ve fewer points, it gives us less precise control. While having more points increases precision but requires more processing time.
  • Expansion: This option expands or contracts the edge of the mesh.
  • Show Mesh: If needed, we can deselect this option to show only adjustment pins, making our adjustments easier to notice.

Related Topics:


Applying Puppet Warp

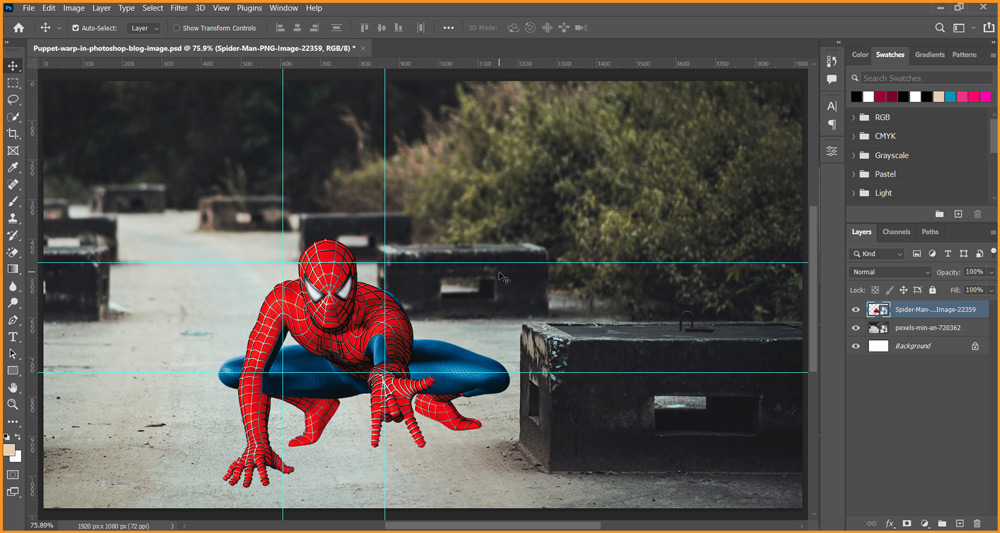
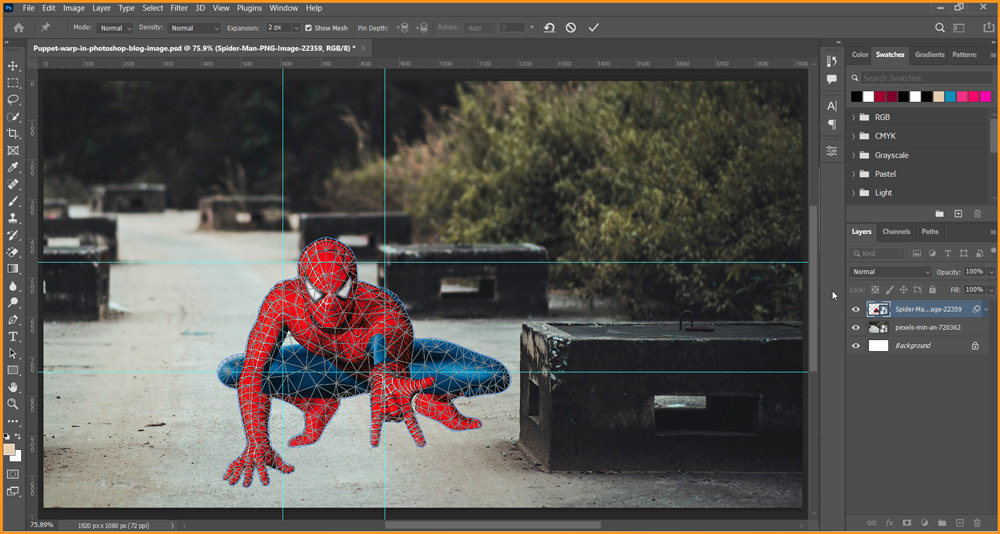
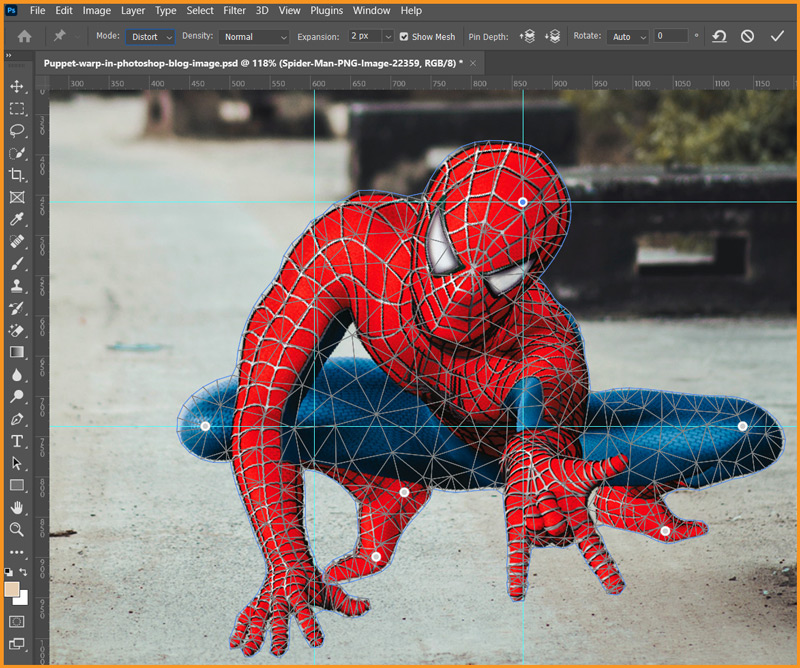
I’ve created a document of size 1920 by 1080 pixels. After that I’ve placed the background image and Spider man PNG above it as shown below along with four guide lines.

images open in photoshop
Images open in Photoshop

Go to Edit > Puppet Warp

Puppet Warp applied to image in Photoshop
Puppet Warp applied to image in photoshop

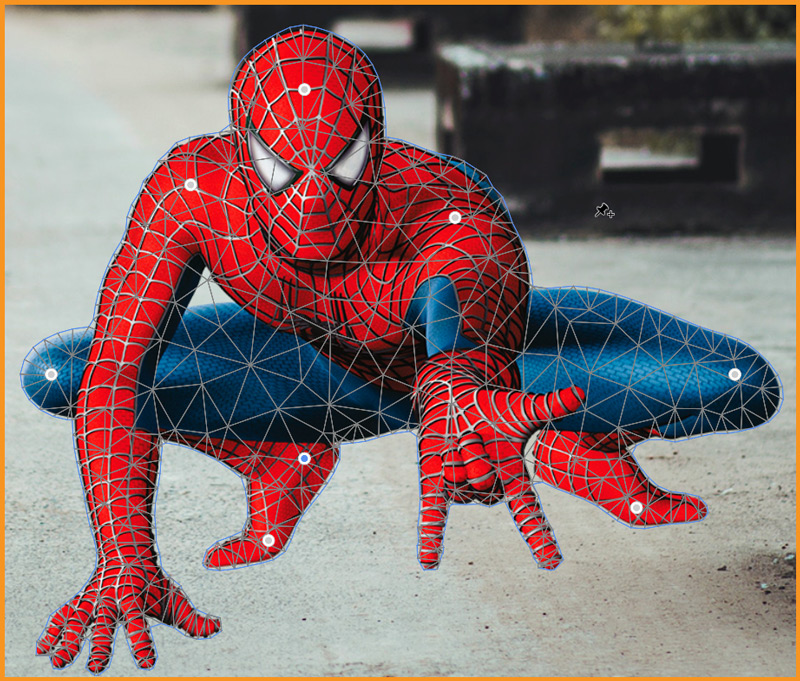
I’ve placed few pins at the following points as shown below.

Pins placed using puppet warp in photoshop
Pins placed using Puppet Warp

Related Topics:


Mode

Mode options in Puppet Warp in Photoshop
Mode option in Puppet Warp

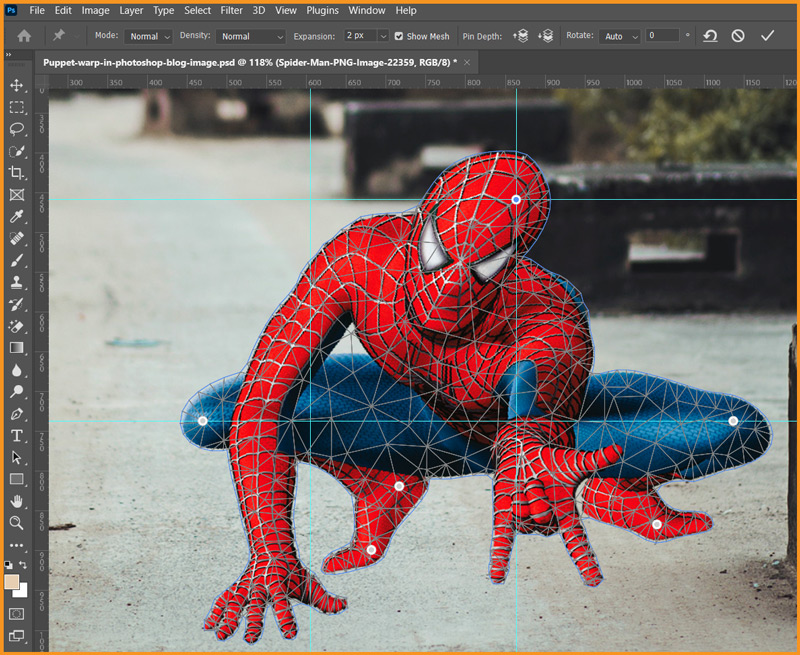
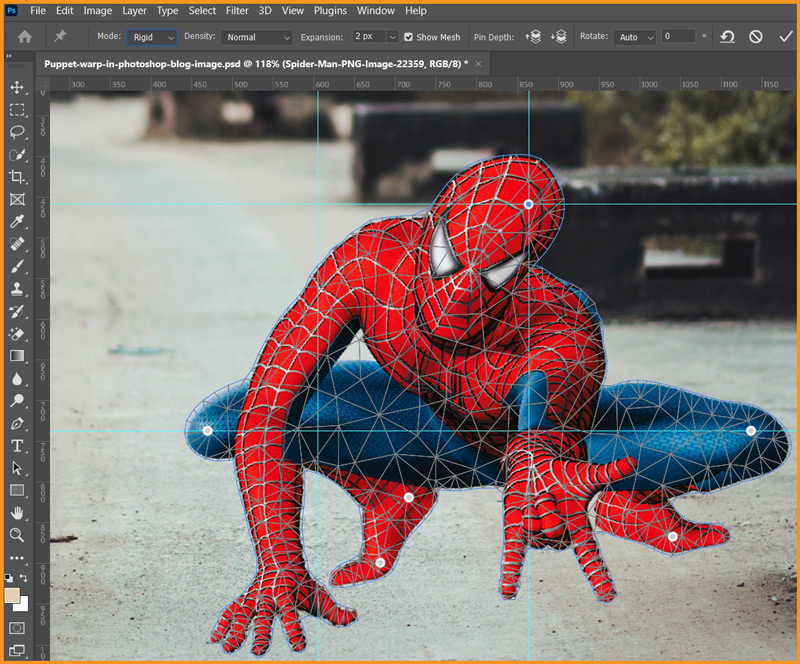
As already discussed, Mode determines the elasticity of our mesh. The three types of mode in Puppet Warp are Rigid, Normal and Distort.

  • By default, it’s set to Normal where we can easily manipulate the position and pose of the subject. Distortion of Head with Mode set to Normal.
puppet warp with mode set to normal
Mode set to Normal
  • Rigid: It has lesser elasticity than Normal. Although it wouldn’t feel as much of difference here.
Mode set to Rigid in Puppet Warp
Mode set to Rigid
  • Distort: In this mode, the perspective and scale is changed around the pinned area.
Mode set to Distort for Puppet Warp
Mode set to Distort

Related Topics:


Density

Density options in puppet warp in photoshop
Density Option in Puppet Warp

It can have one of three values Fewer Points, Normal and More Points. These are self-explanatory by their names.

Density comparison in Puppet warp
Density Comparison in Puppet Warp

Related Topics:


Expansion

Expansion option in Puppet Warp in photoshop
Expansion option in Puppet Warp

Expansion is used to have some extra space outside the pixels of the layer. In this case, I’ve used 10 pixel value for easy visibility. This value could also be placed in negative for contraction.

Expansion option in Puppet Warp in Photoshop
Expansion option in Puppet Warp

Related Topics:


Show Mesh

Show Mesh check box is a toggle to turn the mesh on or off. We’ve seen above it’s effect with this option checked. Below I’ve shown it’s effect with it turned off.

Show mesh option in Puppet Warp in Photoshop
Show Mesh option Puppet Warp

Related Topics:


Pin Depth

Pin Depth option in Puppet Warp in Photoshop
Pin Depth option Puppet Warp

It is used in case, we have our subject’s body parts overlapping one another after distorting the image. Using these icons we can bring the pins controlling those parts on top or bottom of the overlap.


Rotate

Rotate option in Puppet Warp in Photoshop
Rotate option in Puppet Warp

Whenever we move a pin, other pins surround it will rotate according to adjust the distortion. By default it is set to Auto and if their any rotation, it’s numerical value will be shown in the following box.

In order to manually rotate a pin, select the pin then press and hold Alt key. It’ll show the rotation circle to rotate the selected pin.


Related Topics:


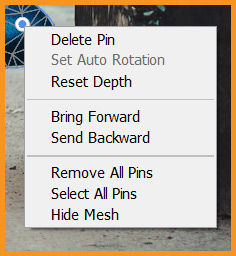
If we right-click on any pin, we will get the following additional options.

Additional pin options for puppet warp
Right-click options for pin

Almost all the options, in this menu are self-explanatory.

  • Delete Pin: To delete selected pin.
  • Set Auto Rotation: If the selected pin’s rotation is not set to Auto. It’ll be set to auto.
  • Reset Depth: To reset the selected pin’s depth to it’s original value.
  • Bring Forward: To bring the selected pin forward.
  • Send Backward: To send the selected pin backward.
  • Remove All Pins: To remove all the pins.
  • Select All Pins: To select all the pins.
  • Hide Mesh: To hide mesh of the Puppet Warp.

Related Topics:


Ad

Content-Aware Scale in Photoshop

Content aware Scale in photoshop

In this Photoshop Lesson, we’ll learn about ‘Content-Aware Scale in Photoshop’. Content-Aware Scale command is available under Edit menu in Photoshop.

My name is Lalit Adhikari and we are at LTY. Let’s begin!


Related Topics:


What is Content-Aware Scale

Content-Aware Scale helps to resize our image without changing any important visual content such as people, buildings, animals and so forth.

Content-Aware Scale was first introduced in Photoshop CS4 and since than it had been updated and made a lot more powerful.

While performing normal scaling, it affects all pixels of our image uniformly, content-aware scaling mostly affects pixels in areas that don’t have important visual content.

Usually, we have to crop an image to change the aspect ration of our image. But with Content-Aware Scale, now there’s no need to crop anything away.

It is because Photoshop can now move people and objects closer together (or further apart), so everything fits well within the new shape!

Content-Aware Scale lets us upscale or downscale images to improve a composition, fit a layout or change the orientation altogether.

If we’ve to preserve specific areas when scaling an image, we can do so using Content-Aware Scale, as it lets you use an alpha channel to protect content during resizing.

Content-aware scale works on:

  • Layers and Selections
  • Images can be in RGB, CMYK, Lab and Grayscale color modes
  • All bit depths are supported
    Content-aware scaling doesn’t work on:
  • Adjustment layers
  • Layer masks
  • Individual channels
  • Smart Objects
  • 3D layers
  • Video layers
  • Multiple layers simultaneously
  • Layer groups
A. Original image B. Scaled narrower C. Scaled narrower, using content-aware scaling

Related Topics:


How does Content-Aware Scale work

With the Content-Aware Scale command selected, Photoshop will examine our photo and try to figure out, high detail areas and low detail areas.

Photoshop will do its best to protect the high detail areas as we’re reshaping the image.

Content-Aware Scale can be a powerful and time-saving feature when it works but (there’s always a catch) the problem is that it doesn’t work indefinitely.

For every image it’ll have a limit after which the image will be distorted. In fact, it really varies from image to image.

In general, we can say Content-Aware Scale works best with photos that contain large areas of low image detail (blue skies, open fields, calm waters, and so on).


Related Topics:


Option Bar with Content-Aware Scale

option bar with Content aware scale
Option bar with Content-Aware Scale
  • Reference Point Location: Here we need to click a square on the reference point locator to specify the fixed point around which we want our image to be scaled. By default this point is at the center of the image.
  • Relative Position: Here we can specify the X-axis and Y-axis reference positions to place our Reference Point.
  • Scaling Percentage: Here, we have to specify the percentage change as compared to the original size. Percentage change in Width and Height are to filled at W and H boxes respectively. By default, aspect ratios are maintained.
  • Amount: It specifies the ratio of Content-Aware Scaling to normal scaling to be done by Photoshop.
  • Protect: Here in the drop down, we can chose the Alpha channel that defines an area to be protected.
  • Protect Skin Tones: If turned on, Photoshop attempts to protect regions that contain skin tones.

Related Topics:


Example for Content-Aware Scale

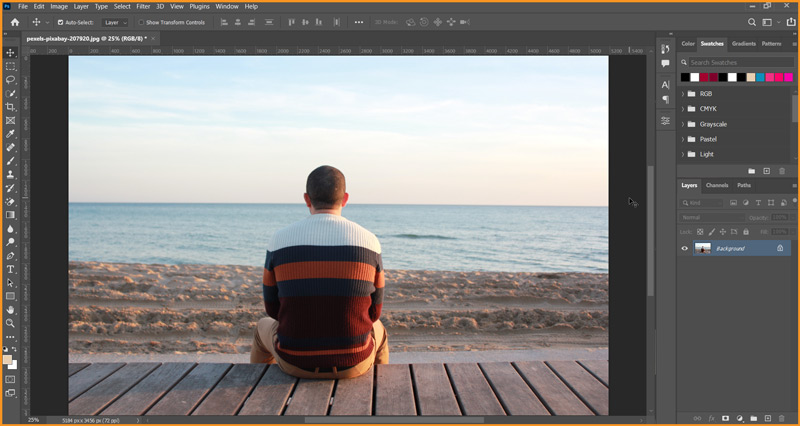
I’ve selected the following image for this example.

  • First open the image in the Photoshop.
Image open in Photoshop
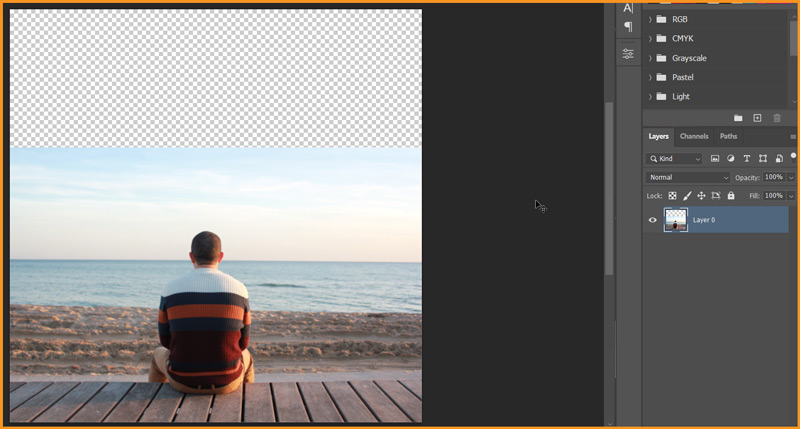
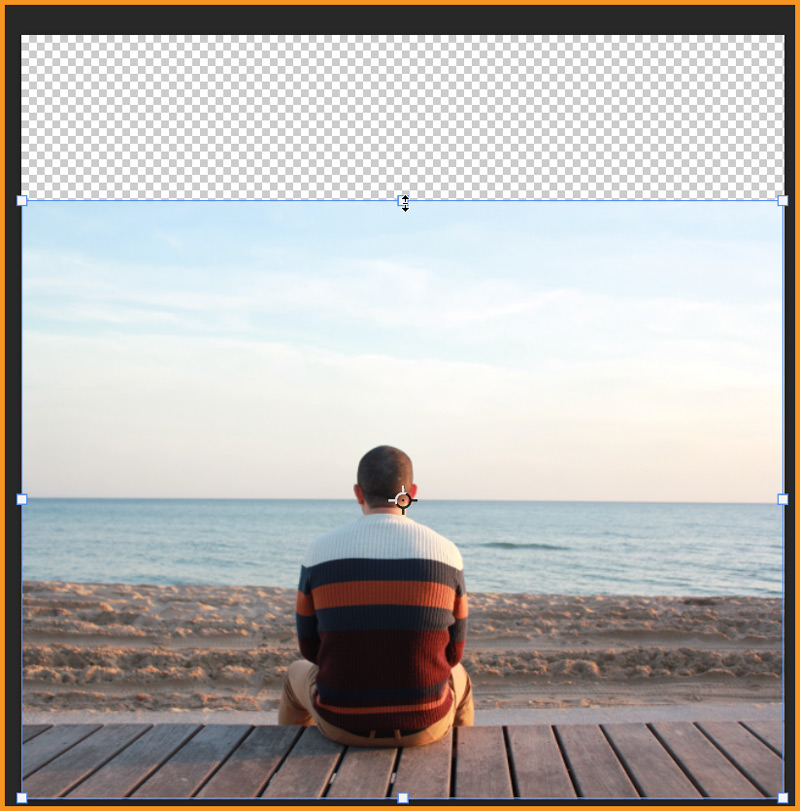
Cropping out from top of Photoshop canvas
Crop out from top of Canvas
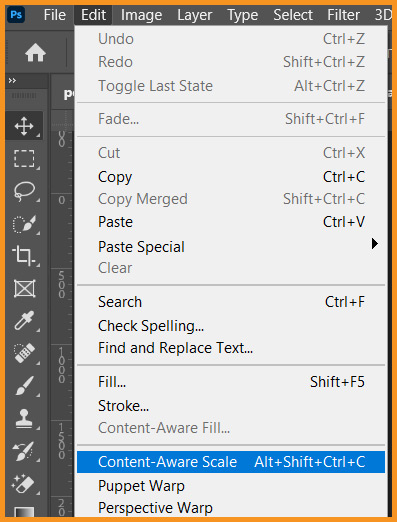
  • Go to Edit > Content-Aware Scale
Content aware scale command in edit menu in photoshop
Content-Aware Scale command in Edit menu
  • In the option bar, turn off, Maintain aspect ratio option.
options for content aware scale in photoshp
Options for Content-Aware Scale in Photoshop
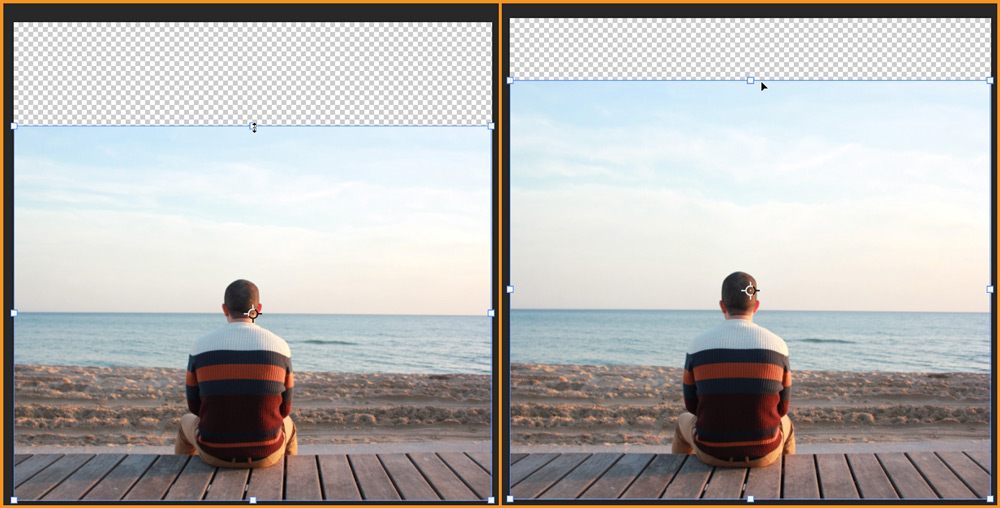
  • In the Bounding box around the image, start dragging the top part from top-center.
content aware scale in photoshop
Content-Aware Scaling in Photoshop
  • After a certain point, Photoshop’s Content-Aware Scale will start distorting our subject.
content aware scale in photoshop
Head gets distorted after a certain limit

Now we can take either of the following two approaches to continue to use Content-Aware Scale.


Related Topics:


Approach – 1

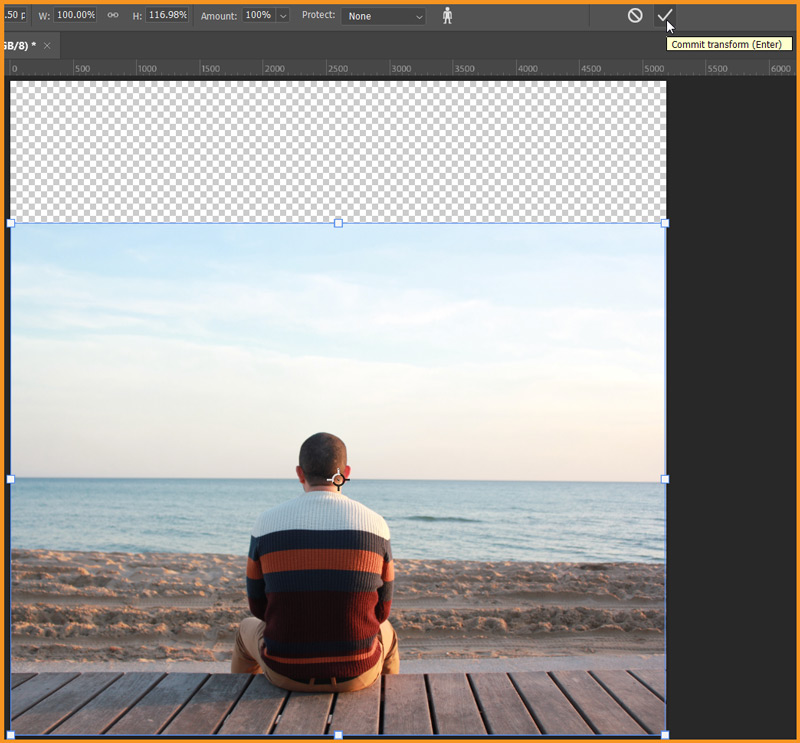
  • First, Scale the image up to the limit after which the subject starts getting distorted and commit the transformation by clicking on the icon or pressing Enter key.
Content aware scale transformation
Commit Transforms
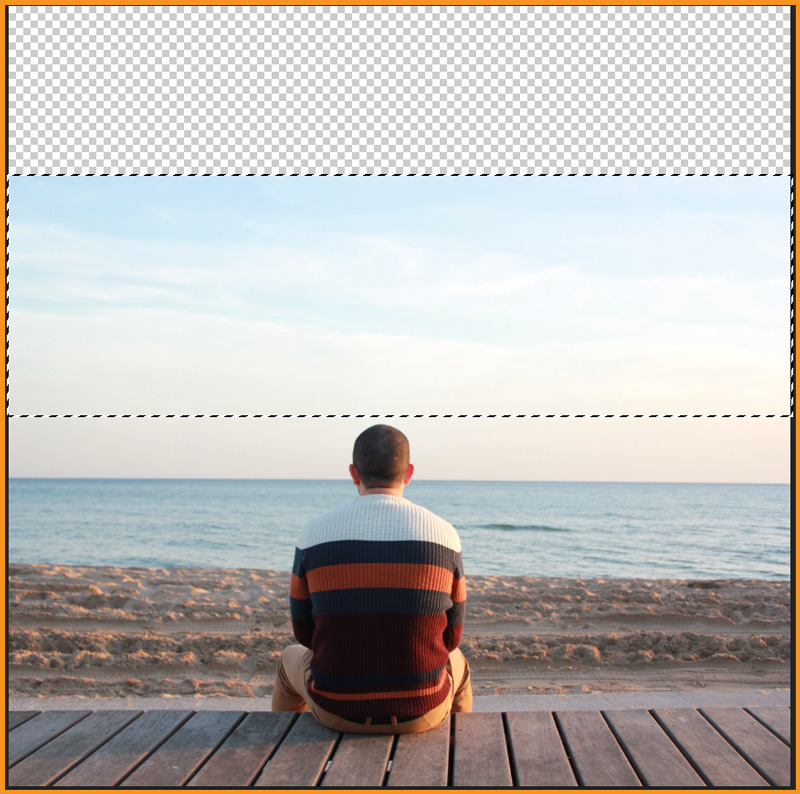
Selection of sky using rectangular marquee tool in photoshop
Selection created above the head

Now, apply Content-Aware Scale, same as before. Then commit transform and remove selection.

Final output after Content aware scale in photoshop
Final output

Related Topics:


Approach – 2

Second approach involves creating a rough selection of our subject and saving it as Alpha channel in Channels Panel.

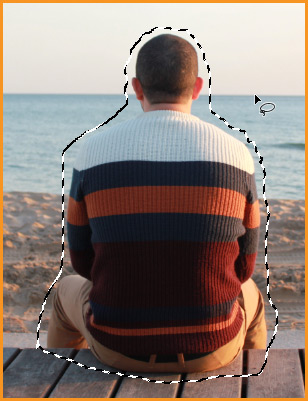
  • Take Lasso Tool and create a rough selection around the subject and important things if you are using a different image.
selection around the subject
Selection around subject
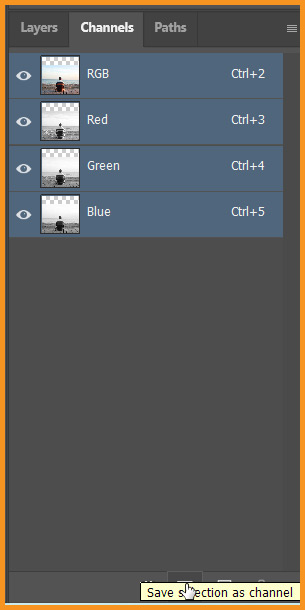
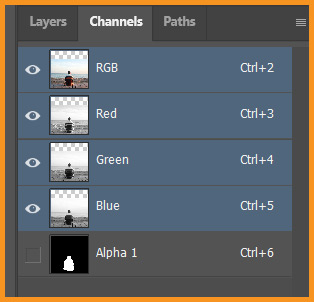
  • Go to Channels Panel and click on Save selection as channel icon as shown below.
Channels panel in photoshop
Save Selection as Channel

This will create a Alpha 1 channel in Photoshop’s Channel panel as shown below.

Alpha 1 channel in Channel Panel in photoshop
Alpha 1 channel
  • Remove selection from screen. Then apply Content-Aware Scale and do following in option bar.
Protect option in content aware scale in photoshop
Change Protect from None to Alpha 1

Then, drag the image from top as done earlier and commit transform.

final output of content aware scale in photoshop
Final Output

Related Topics:


Ad

Content-Aware Fill in Photoshop

Content Aware Fill in Photoshop

In this Photoshop Lesson, we’ll learn about ‘Content-Aware Fill in Photoshop’. Content-Aware Fill command is available under Edit menu in Photoshop.

My name is Lalit Adhikari and we are at LTY. Let’s begin!


Related Topics:


What is Content-Aware Fill

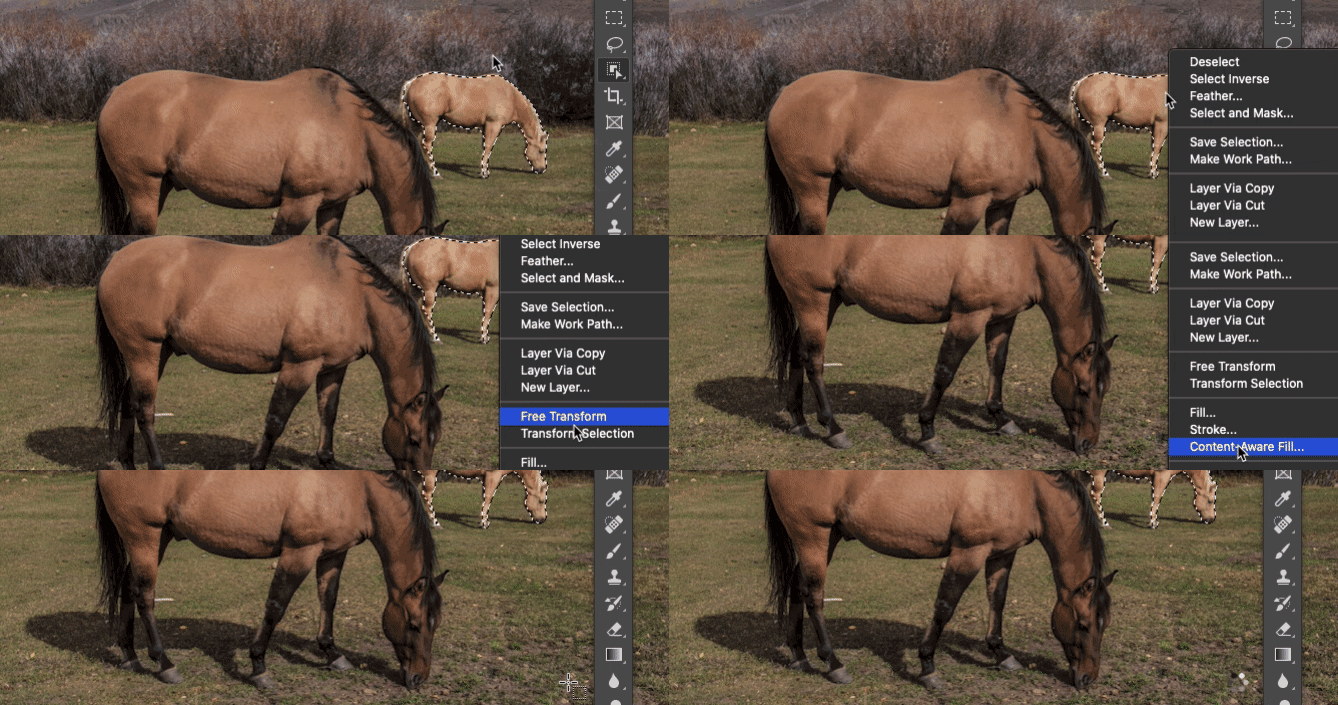
Content-Aware Fill is an advanced Algorithm Powered option in Photoshop which allows user to Fill, Move or Remove unwanted objects from a photograph with ease.

Photoshop Fills the selected area with the help of surrounding similar pixels which are called as Sampling area.


Remove objects with Content-Aware Fill

We will learn to remove objects with Content-Aware Fill in Photoshop.

  • Select the Object to be removed

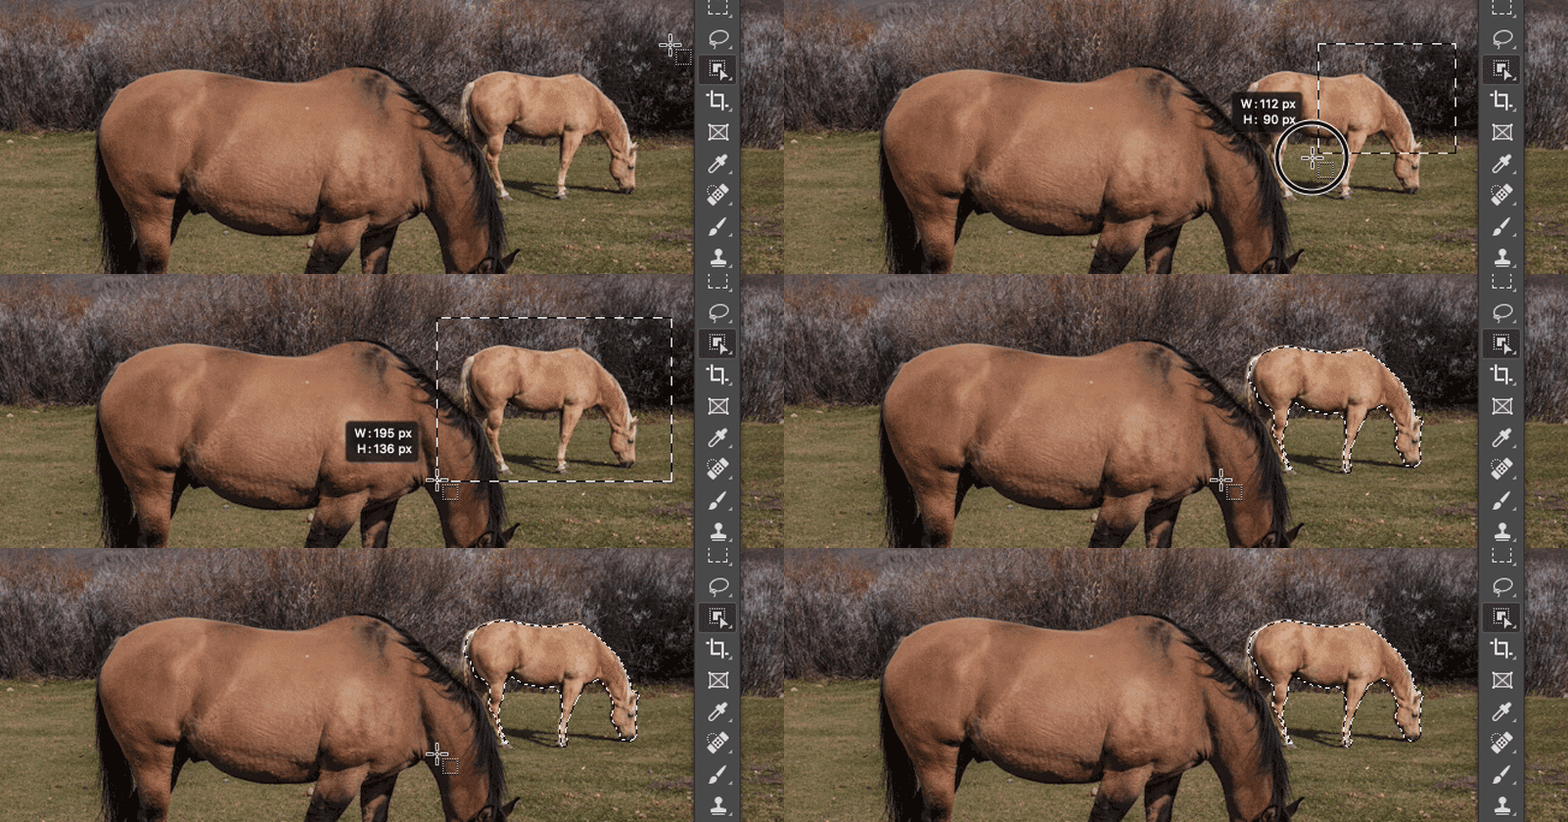
Make a quick, rough selection of the object to be removed using any of the Selection Tools in Photoshop.

  • Open Content-Aware Fill
    • Right-click within the selection and choose Content-Aware Fill…
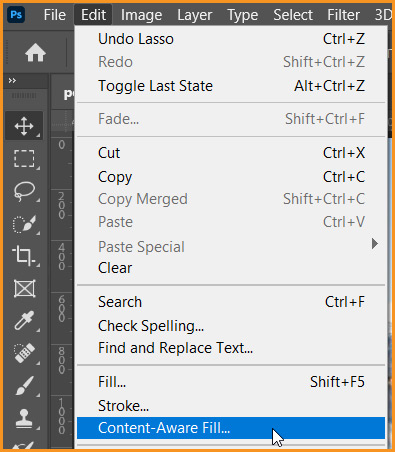
    • Or go to Edit > Content-Aware Fill…
Content-Aware Fill command under Edit menu in Photoshop
Content-Aware Fill under Edit menu in Photoshop
  • Refine the selection

We don’t need to create a perfect selection but still don’t deviate to much from the edges. Try to keep selection few pixels away from edges.

  • Click OK when the result seems appropriate.

Related Topics:


Tools in Content-Aware Fill Workspace

While working with Content-Aware Fill, the Workspace of Photoshop gets modified a little as shown below.

It’s called Content-Aware Fill Workspace. The tools provided in this workspace are discussed below.


Related Topics:


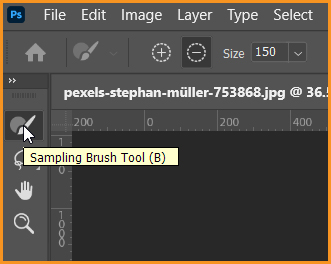
Sampling Brush Tool

Sampling Brush Tool in Content-Aware Fill Workspace
Sampling Brush Tool

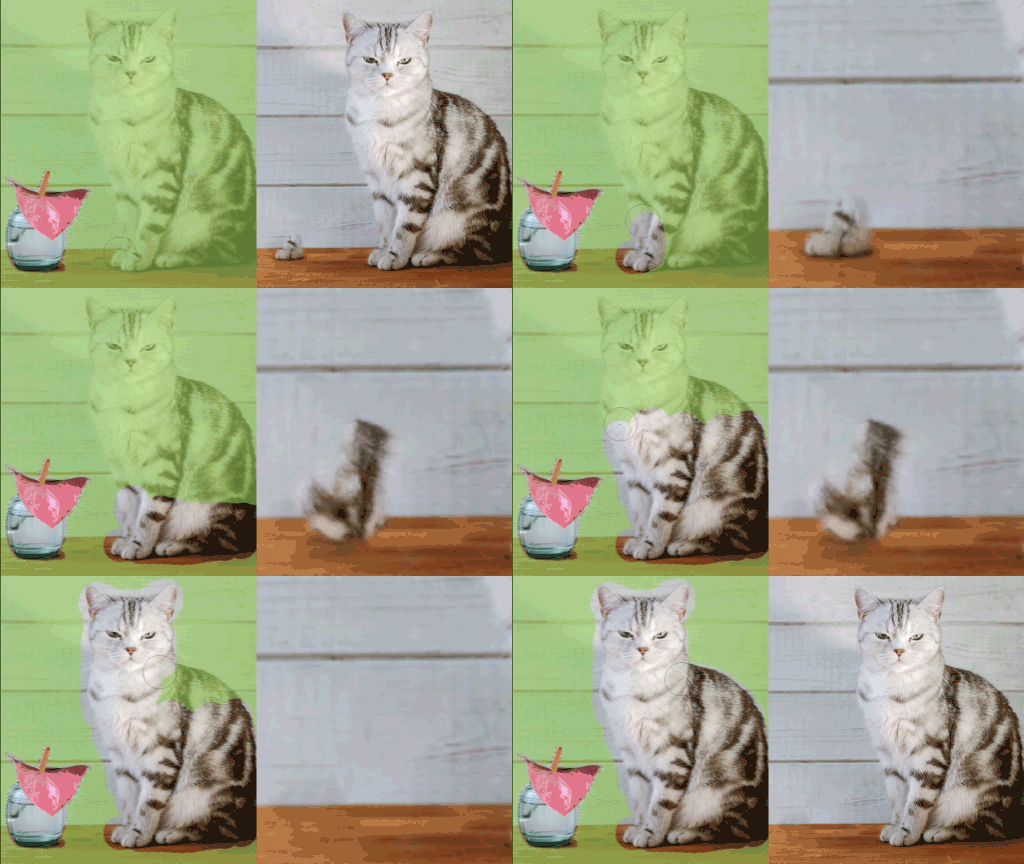
We can paint with the Sampling Brush Tool in the document window to add or remove sampled image areas (as done in case of layer mask) used to fill the selection.

  • If we’ve to add to the default sampling area, we’ve to choose the Add mode in the Options bar and brush over the areas in the image we want to include in the sampling area overlay.
  • If we’ve to remove from the default sampling area, we’ve to choose the Subtract mode in the Options bar and brush over the areas in the image we want to exclude from the sampling area overlay.
  • In case if we need to toggle between Add and Subtract modes, we can simply hold down Alt (Windows)/ Option (macOS) key while brushing with the Sampling Brush Tool.
  • If we need to increase or decrease the Sampling Brush size, we simply use the Size option in the Options bar or use the left/right curly bracket keys.

Related Topics:


Selection Refinement Tools

Selection Refinement tools in Content-Aware Fill Workspace

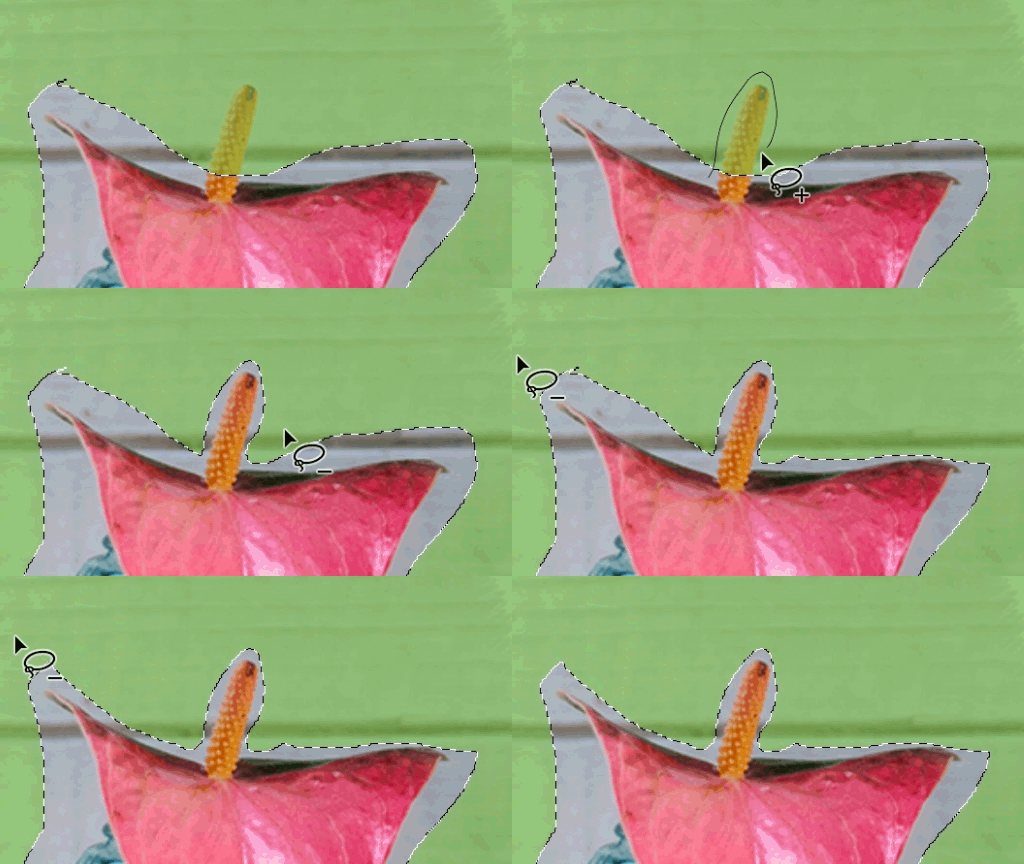
We can use either the Lasso Tool or Polygonal Lasso Tool to change or modify our original selection (are to be filled) in the document window.

  • We can press E key to cycle through the Lasso Tool selection modes – New Selection, Add To Selection, Subtract From Selection and Intersect With Selection.
  • With either of the Lasso Tool selected, we can use the Expand or Contract buttons to expand or contract the selection by a specified number of pixels, respectively. We can click these buttons in the Options bar.
  • To reset all changes made in this workspace to the original selection, click the reset icon in the Options bar.

Note: In case we change the selection, the sampling area gets reset but the previous brush strokes are preserved. The selection also gets updated in the document when we exit the Content-Aware Fill workspace after completing the fill.


Related Topics:


Navigational Tools

Navigational Tools such as Hand tool and Zoom tool in Content-Aware Fill Workspace
Hand tool and Zoom tool
  • Hand Tool: It is used to pan over different parts of the image in the document window as well as the Preview panel. We can quickly toggle to the Hand Tool by holding the Spacebar key while using any other tool.
  • Zoom Tool: Zoom in or zoom out the view of the image in the document window or the Preview panel.

Related Topics:


Content-Aware Fill Panel Settings

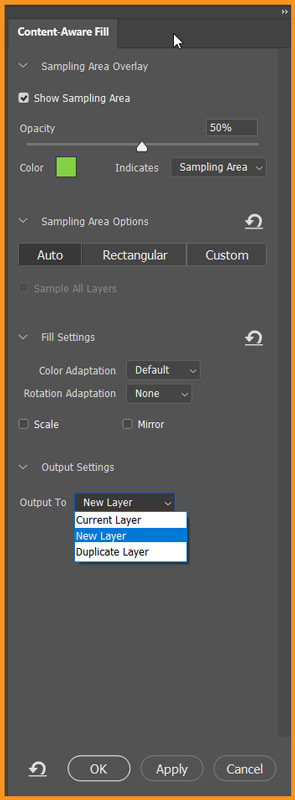
Content-Aware Fill Panel in Photoshop

We can adjust the following settings in the Content-Aware Fill Panel.


Related Topics:


Sampling Area Overlay

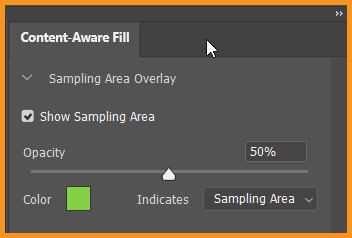
Sampling Area Overlay in Content-Aware Fill Panel
Sampling Area Overlay
  • Show Sampling Area: Selecting this option will show the sampling area or the excluded area as an overlay on the image in the document window.
  • Opacity: To determine the opacity of the overlay displayed in the document window. To adjust the opacity, drag the slider or type a percentage value in the text box.
  • Color: To determine the color of the overlay displayed in the document window. Click the color selection box and then choose a color from Adobe Color Picker.
  • Indicates: To determine where to show the overlay in the sampling or the excluded area. Choose an option from the drop-down list – Sampling Area or Excluded Area.

Related Topics:


Sampling Area Options

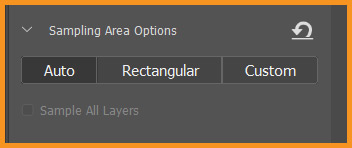
Sampling Area Options under Content-Aware Fill Panel
Sampling Area Options

Sampling area is used to determine the area in the image where we want Photoshop to look for source pixels to fill content.

  • Auto: Selecting this option, Photoshop will use content similar to surrounding fill area.
  • Rectangular: Selecting this option, Photoshop will use rectangular region around fill area.
  • Custom: Selecting this option, we have to manually define a sampling area. Use the Sampling Brush Tool to add to the sampling area.
  • Sample All Layers: Selecting this option, Photoshop will sample source pixels from all the visible layers in the document.

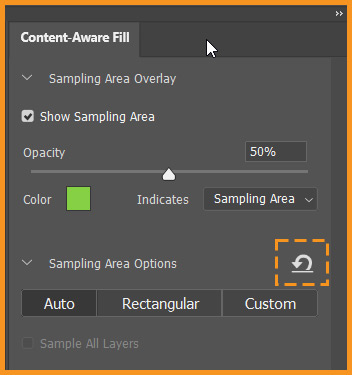
To reset to default sampling area, click the reset icon next to the Show Sampling Area option.

Reset Sampling Area icon in Content-Aware Fill Panel
Reset Sampling Area icon

Related Topics:


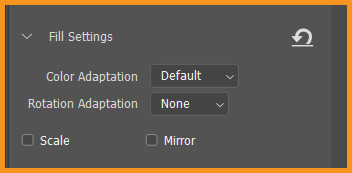
Fill Settings

Fill Settings in Content-Aware Fill Panel
Fill Settings
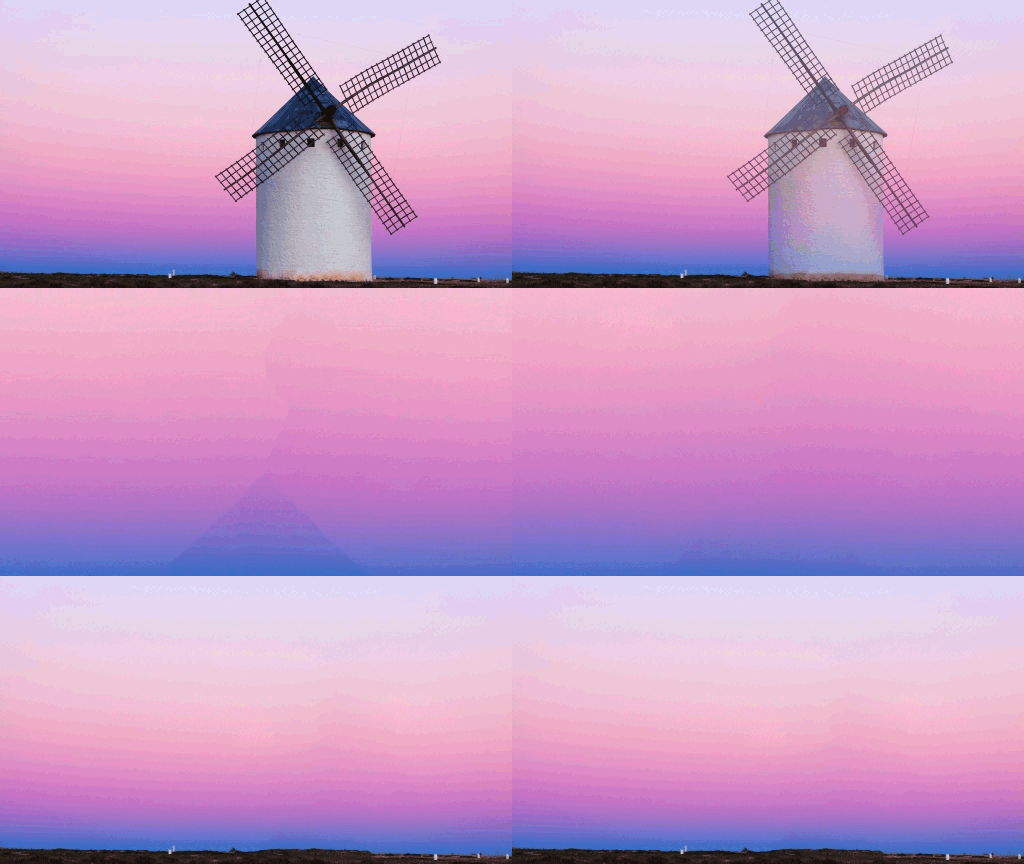
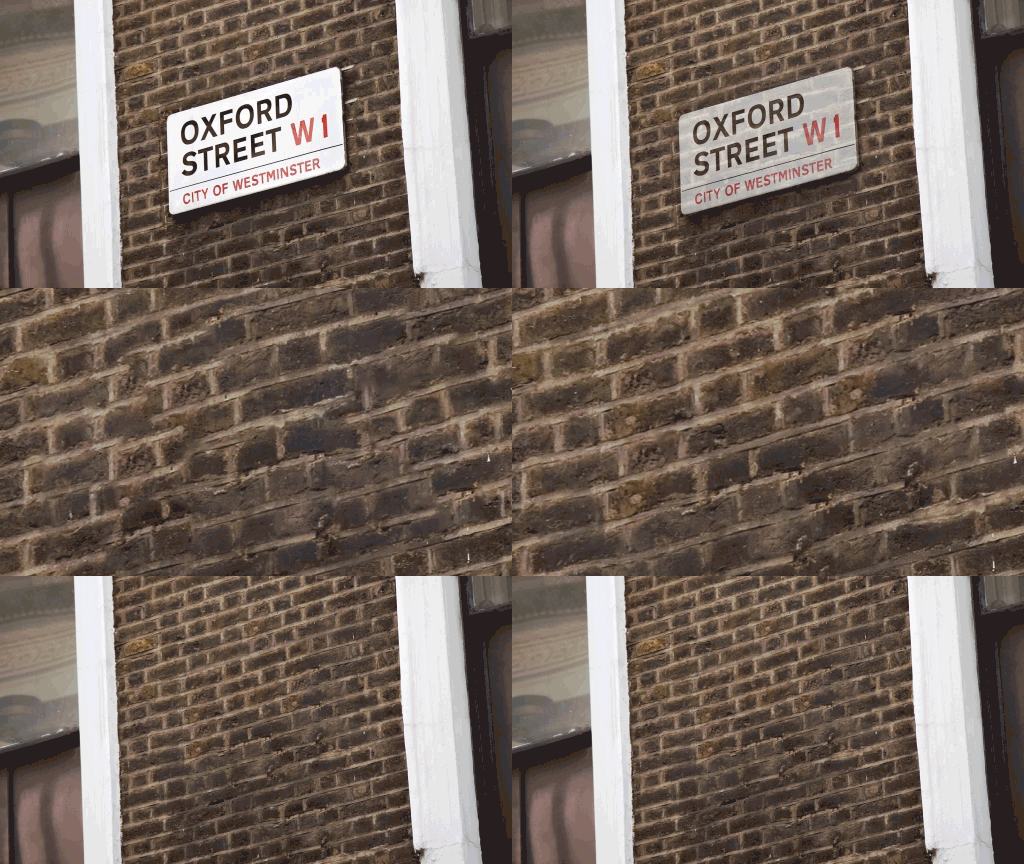
  • Color Adaptation: This options allows for contrast and brightness to adapt for a better match. It is useful for filling content with gradual color or texture changes. Choose an appropriate option from the drop-down list – None, Default, High or Very High
  • Rotation Adaptation: This options allows content rotation for a better match. It is useful for filling content with rotated or curved patterns. Choose an appropriate option from the drop-down list – None, Low, Medium, High or Full
  • Scale: Selecting this option will allow content resizing for a better match. It works well for filling content with repeating patterns of different sizes or under perspective.
  • Mirror: Selecting this option will allow content to be flipped horizontally for a better match. This is useful for images with horizontal symmetry.

To reset to default fill settings, click the reset icon in the Fill Settings menu.


Related Topics:


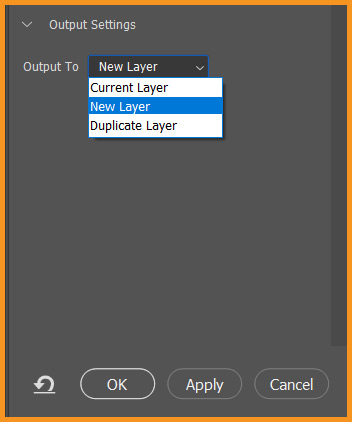
Output settings

Output Settings in Content-Aware Fill Panel
Output Settings
  • Output To: Apply Content-Aware Fill to Current Layer, New Layer, or Duplicate Layer.
  • Click on OK button to commit Fill and Close the Content-Aware Fill Workspace.
  • Click on Apply to commit Fill and keep the Content-Aware Fill Workspace open.
  • Click on Cancel, to cancel Fill and exit workspace.

To reset all setting changes made in the Content-Aware Fill Panel, click reset icon.

Content-Aware Fill Panel Reset

Related Topics:


Ad

Stroke in Photoshop

Stroke in Photoshop

In this Photoshop Lesson, we’ll learn about ‘Stroke in Photoshop‘, ‘How to add Stroke in Photoshop‘ and ‘How to add Stroke to text in Photoshop‘. Stroke command could be found under Edit menu in Photoshop.

My name is Lalit Adhikari and we are at LTY. Let’s begin!

Ad

Fill in Photoshop

Fill in Photoshop

In this Photoshop Lesson, we’ll learn about ‘Fill in Photoshop‘. Fill command is available under Edit menu in Photoshop. Do not forget to read important shortcuts related to different types of fill at the end.

My name is Lalit Adhikari and we are at LTY. Let’s begin!

Ad