In this Photoshop Lesson, we will be discussing about, ‘Image menu in Photoshop‘. My name is Lalit Adhikari and we are at LTY. Let’s get started!
Related Topics:
Introduction
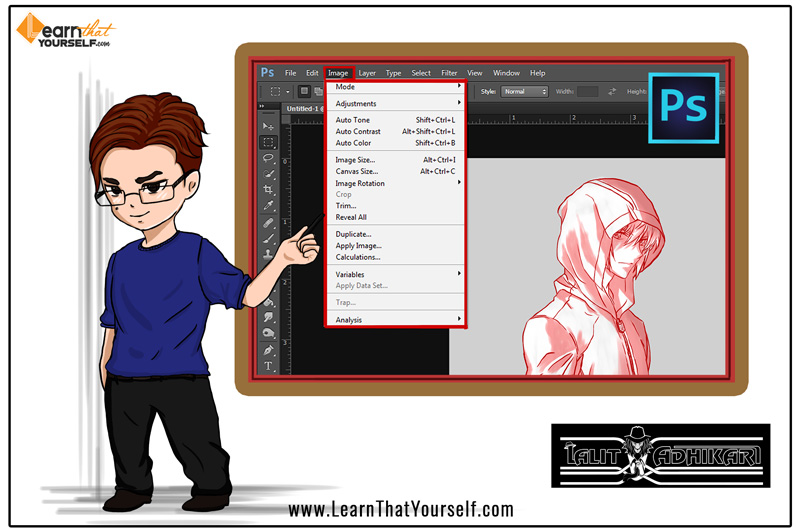
Image Menu is the third menu option in menu bar of Adobe Photoshop after File Menu and Edit Menu in Photoshop. You can access this panel by clicking on the image menu in the menu bar. There are many options in this menu and they are discussed below.
Mode
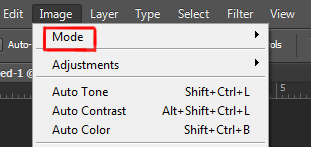
The first option in the image menu in Adobe Photoshop is ‘Mode’. It is a way of Photoshop to determine, ‘How the components of the color are combined in an image or document‘.
Types of mode
There are eight modes in Adobe Photoshop. The following modes are:
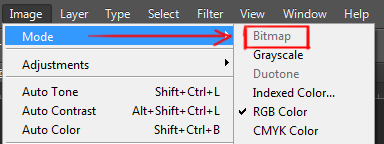
Bitmap: Bitmap mode of images is simply black and white images. Pixels of these images consist only two colors and are defined using by one bit of data which is zero or one. The tools like burn and dodge, Smudge and Blur don’t work in this mode of images. You can save these images in any format.
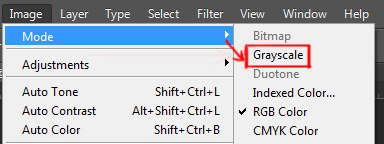
Grayscale: This mode of images is generally in two forms 8 bit and 16 bit. In 8 bit images, in this mode, each pixel has a value between ‘0 to 255’. Its mode consists of 1 color component i.e., grey. In 16 bit images of this mode, each pixel has a value between ‘0 to 32768’.
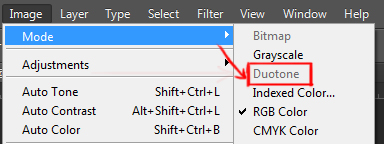
Duotone: In this mode, the tonal range of the grayscale image is increased. Duotone uses different colors to produce different levels of grays, so they are treated as single channel 8 bit grey scale images. This ‘mode‘ computes the highlights and middle tones of grayscale images in one color and allows the user to choose any ink for printing as the second color.
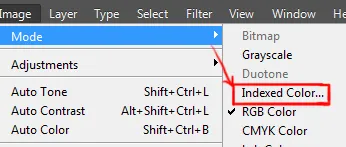
Indexed color: This image mode is 8 bit images and uses up to 256 colors. Indexed images can reduce its file size by maintaining the images visual quality. Very limited editing option is available in this mode. This mode is called indexed mode because Photoshop builds a color look-up table which stores and indexes colors of the image.
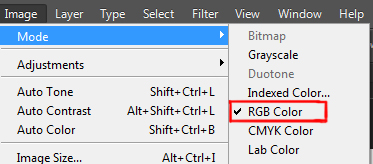
RGB: This mode is the most common mode for digital display and it consists of three colors: Red, Green and Blue. This mode consists of more than 16 million shades of colors and provides the advantage of having of maximum editing option. Photoshop also allows you to work with 48 bit RGB files which contain three 16 bit channels. You can get much flexibility editing 48 bit images if it has layers.

CMYK: This is a mode for color printing which consists of four colors: Cyan, Magenta, Yellow and Key (black). Every color in this spectrum is stimulated by a combination of these colors in different amounts. If you are opening CMYK files in your display the image you will see is in RGB mode, as this mode is only used for display. Hence, the real result will be altered.

Lab: This mode is used as a reference when switching the modes between RGB and CMYK modes. This mode is less intuitive than other color modes. Here L stands for ‘lightness’ ranging from 0 to 100. ‘a’ represents how green or red a color is (where negative values represent green and positive value represents red) while ’b’ represents how yellowish and blue color is (here positive values are for yellow and negative values are for blues). Grayscale and black & white images have values close to zero in these both channels.
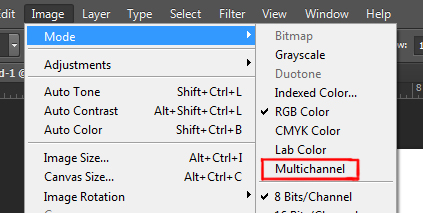
Multichannel: This is the last mode of Adobe Photoshop. This mode consists of 256 levels of grey in each channel and is used for specialized printing. While converting this mode to any other node it flattens the image if it has layers.
Related Topics:
- Select menu in Photoshop
- Edit menu in Photoshop
- Foreground Color, Background Color, Stroke & Fill in Photoshop
Adjustments
Next option in the image menu is ‘Adjustments’. Like ‘Mode‘, it also has fly-out menu which has several options available to make Adjustments in the image.
Brightness/ Contrast

This option is used in making tonal adjustments in the image. Whenever you will click this option, a dialogue box will open up in which you will find two sliders. The first slider is ‘brightness’ slider which controls the highlights of the image and another slider is ‘contrast’ slider which controls the highlights of the image.
Levels
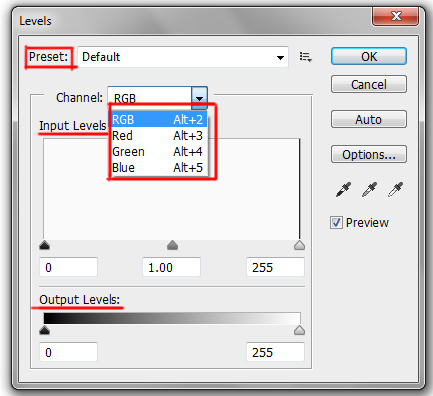
This options in used to modify the tonal values of the image. And this is done by adjusting the shadows, mid-tones and highlights. Like every other option, whenever you will click on this option a dialogue box will open up in which you will see few options.
The first option in the dialogue box is a drop-down menu called ‘preset’ where you can find various presets like darker, lighter, mid-tone brighter, etc. The second option in this box is ‘channel’, apart from RGB which is set as a default, there are three more options: red, green and blue.
And that means you can change the levels of redness, greenness, and bluishness of the image separately. Below the channel option, there is a histogram for changing the ‘input levels’ and a slider bar to change the ‘output’ levels.
In ‘input’ slider there are three components which you can change and that is ‘black point’ slider for shadows, ‘mid-tone slider’ for mid-tone, and ‘white point’ slider for highlights. The shortcut key for this command is Ctrl + L
Curves
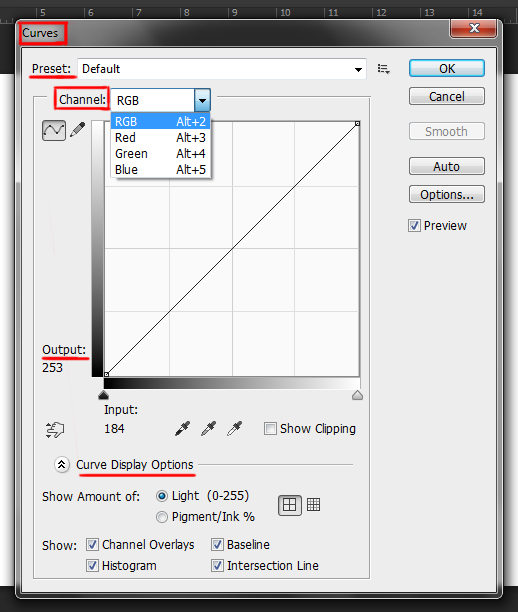
In this option, we can edit the tone of the image. Even though this option is quite similar to the previous one but in this option, you will get very good precision with adjusting the tone of the image.
As you open the dialogue box of the curve, the first thing you will find is a diagonal line graph which represents the image tonal range. The x-axis of the graph represents the old values and the y-axis represents the new adjusted values of the image.
You can click and add more points in the graph to the graph to adjust the overall tone of the image while creating more flexibility. Pulling the points down makes the image dark and pulling the points up makes the image brighter. Shortcuts key for this command is Ctrl + M
Exposure

In this option, we can adjust the tonal values. As you open the exposure dialogue box you will find three main options which will determine your overall change in exposure of the image.
The first option is ‘exposure’ itself which adjusts the highlights of the image. Next option is offset, which adjusts the mid-tones and shadows. And the last option is gamma correction which adjusts only the mid tone of the image.
There are three eyedroppers at the right side of the dialogue box for adjusting the luminance values of the image. From the left these eyedropper tools are:
- ‘Sample in image to set the black point’: And this option sets the offset value. The pixel, in which you click, will become the black point.
- ‘Sample in image to set grey point’: This option sets the exposure value. The pixel in which you click will become the middle grey point.
- ‘Sample in image to set the white point’: This option also sets the exposure value. The pixel in which you click will become the white point.
Vibrance
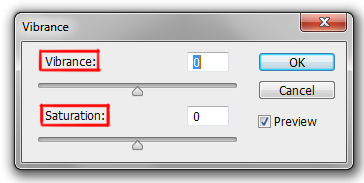
This is the option to change the vibrancy of the image. When you will click on this option you will find two sliders in your dialogue box. One is for Vibrance itself and other is for Saturation. Saturation slider can change the saturation of all the colors in the image. And Vibrancy slider only changes the saturation of least saturated colors of the image.
Hue/ Saturation
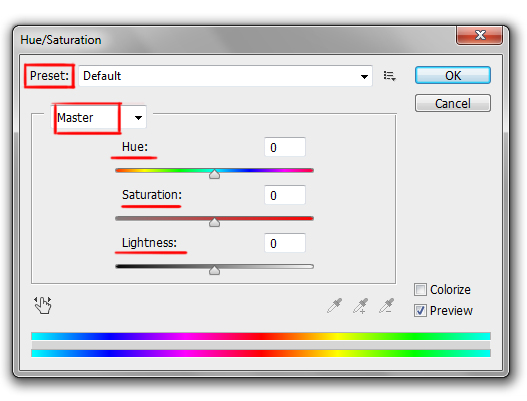
In this option, you can change the hue, saturation, and lightness of the image. Whenever you will open the dialogue box of this option you can see ‘preset’ which is a drop-down menu where you will find options like ‘master’ which is set as default and is used for changing the values of the whole image.
These other options are red, yellow, green, cyan, blues and magenta, and these options are used to change the saturation values of these particular colors in the image. The three sliders below this option are ‘Hue’ slider which controls the color of the image, ‘saturation’ slider which controls the saturation and ‘lightness’ slider controls the luminosity or brightness of the image.
In the corner of the dialogue box, there is an option called ‘colorize’ which usually remains unchecked by default and this is used to change the color of the image to a new single color. This tool is very useful if you have a requirement to make grayscale images in color.
The shortcut key for using this option is Ctrl + U
Color Balance
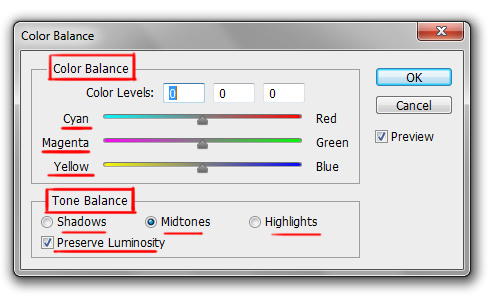
This option helps you to adjust the mixture of colors in the image. The change of colors is much more subtle than changing of color by ‘Hue’ in the previous option. There are three sliders in color balance panel and these are cyan-red, magenta- green and yellow-blue.
You can change the color of your image by adjusting those sliders. Underneath this, there is an option for ‘Tone Balance’ in which there is three options shadows, mid-tones, and highlights where you can change the color of your shadows, mid-tones, and highlights of your image.
At the bottom of the dialogue box, there is an option called ‘preserve luminosity’ which is usually unchecked by default and it modifies the color of the image while contrast and brightness remain unchanged.
The shortcut key for using this option is Ctrl + B
Black and White
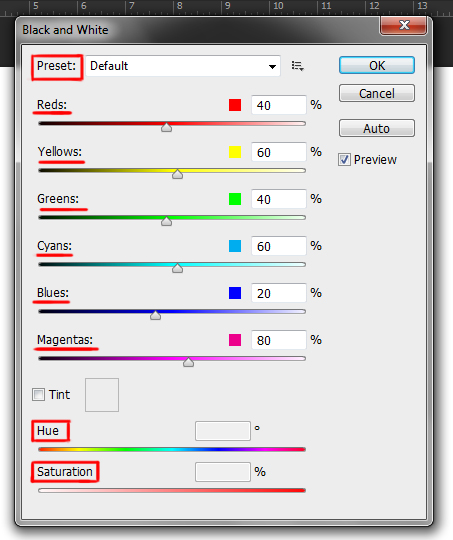
This option allows us to visualize color images into grayscale. As you open the dialogue box the first option find is ‘default’ which is a drop-down menu where you will find different options like the blue filter, darker, green filter etc.
Underneath this, there are various color sliders like red, yellows, greens, blues and magenta and all these sliders can be used to determine how brighter and darker these colors you want in your black and white image to be.
When you convert an image from colors to black and white you usually lose all the colors and turns them into brightness values and that’s what you can control here. For example, if you take an image of the sky, you know it has lots of blue in the background.
So if you increase the value in the blue slider, the background will automatically brighten up or if you turn it down it will darken the background. There are two additional sliders for hue and saturation, where you can also change the brightness and darkness of the image according to hue and saturation values.
The shortcut key for using this option is Alt + Shift + Ctrl + B
Photo Filter
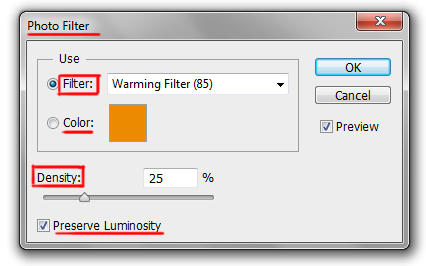
This option is used to warm up or cool down the overall pixels of the image. As you open up the dialogue box of this option the first option you will find is ‘filter’ which is a drop-down menu available with many options for warming and cooling filter.
Underneath this, there are options like ‘color’ option which brings us Photoshop’s color picker tool and we can choose what kind of color we want in our Photo filter. There are also other colors available on the ‘filter’ preset itself.
Below the ‘color’ option, there is a ‘density’ slider in which you can increase or decrease the amount of color in the filter. And at last there is ‘preserve luminosity’ which helps to keep the luminosity of the image, so make sure to keep this option checked so that image will not be darkened. After you are complete with your editing hit the ‘ok’ button and the dialogue box will close.
Channel Mixer
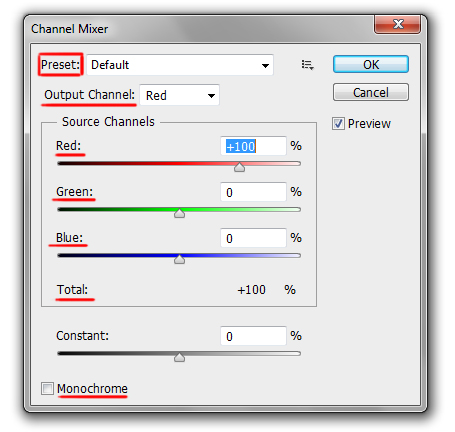
Channel Mixer allows you to control how the three channels interact with each other. Like every other option this also opens up a dialogue box and the first ‘option’ you will see is ‘presets’ which is a drop-down menu.
Below this, there is ‘output-channel’ and this is the channel that you are working on at present, this is also a drop-down menu which has options like red, green and blue. There are three sliders for red, green and blue and they control the ‘amount’ of colors.
So, from these sliders, you can increase or decrease the amount of red, green and blue colors. Underneath these, there is a slider for ‘contrast’ where you can further adjust the grayscale value of the selected output channel.
To get a ‘black channel’ drag the slider towards negative value and to get the white channel to drag the slider towards positive value. If you check the ‘monochrome’ value then it will apply the same settings to all output channels, producing a color image that has only values of gray.
Color Lookup
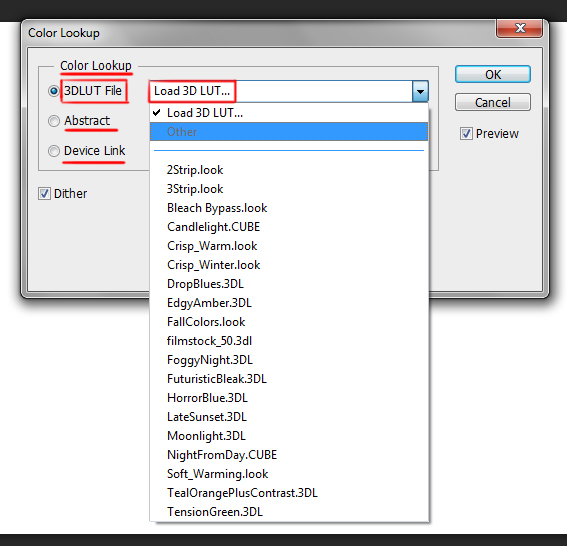
This is another adjustments option in Photoshop and when you click on that a dialogue box will open up and the first option is the 3DLUT file. LUT stands for Lookup Table and 3D stand for three colors: red, green and blue.
And this option allows you to map one color to another color. The ‘3D LUT’ option is a drop-down menu where you will find different options like 2 Strip, 3Strip, beach bypass, etc. Underneath this option, there are other options called ‘Abstract’ and ‘Device Link’.
This is also a drop-down menu which has lots of presets which will make your remapping process more effective. You can also make your customized color Look up by software like Adobe Speed Grade and then load it into Photoshop.
The shortcut key for using this option is Ctrl + I
Invert
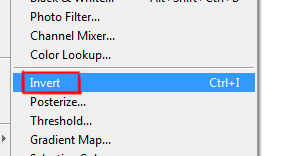
In this option, you can invert the color of the image and get a negative effect of your photo.
Posterize
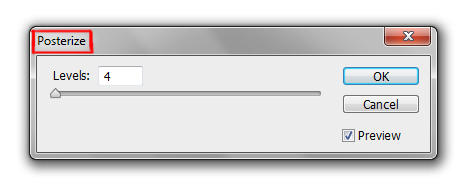
In this option, you can reduce the brightness values of the image and thus giving it a ‘poster’ like appearance. After clicking on this menu, you will get a dialogue box where you will get only one slider bar for ‘levels’ and you can use this slider to increase and decrease the value of these levels.
Threshold
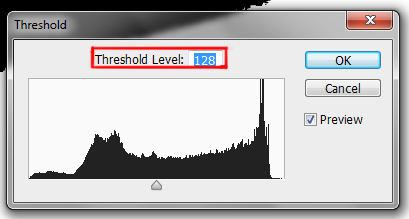
This is another option in the flyout menu which turns the image into black and white. And there is only one option available in the dialogue box which is a level slider which controls the threshold of how many pixels will turn into ‘black’ from ‘white’.
Gradient Map
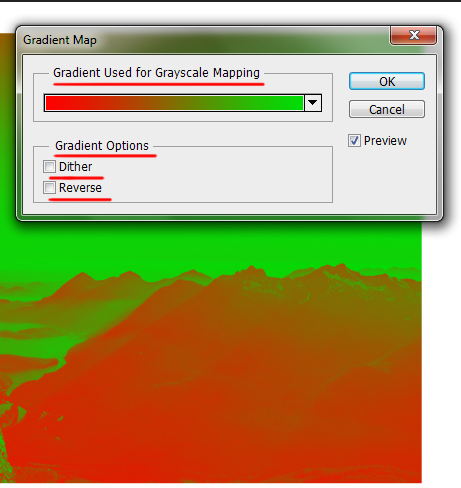
This option allows a grey scale range of the image to convert into a custom gradient fill. Means it takes your grey scale image and replaces the black, gray and white tones with colors of your choice.
Thus it changes lightest tones of your image to one color and darkest tones of your image to another one and the grey tones are changed into intermediate colors in between. Now, if you open the dialogue box of this option you will find the first option as a gradient bar which works similarly like gradient tool and has all the presets and settings available as that tool.
Underneath that there are other two options called ‘dither’ and ‘reverse’. In ‘dither’ you can add random noise to the gradient which will eventually reduce the banding and in ‘reverse’ you can simply change the direction of the gradient. After you are done with your gradient map hit ‘ok’ and it will close the dialogue box.
Selective Color
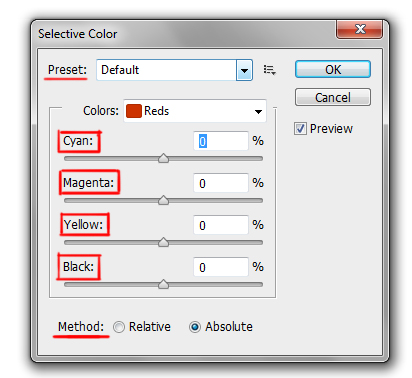
This option is used to convert the whole image into black and white while the main subject will remain in full color. There are nine color channels in selective color and four color sliders for each. These four sliders are cyan, magenta, yellow and black. The first three sliders can affect the density of each color within the specific channel. The black slider is for adjusting the brightness and contrast of that specific color channel.
Shadows/ Highlights
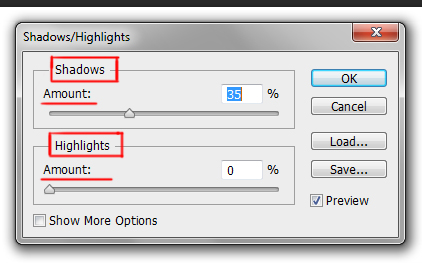
This option allows you to adjust the shadows and highlights of your image. This option allows you to bring out the hidden details of your image by increasing or decreasing the tonal range. As you open up the dialogue box of this option, you will find two sliders, one for shadows and another for highlights.
HDR Toning
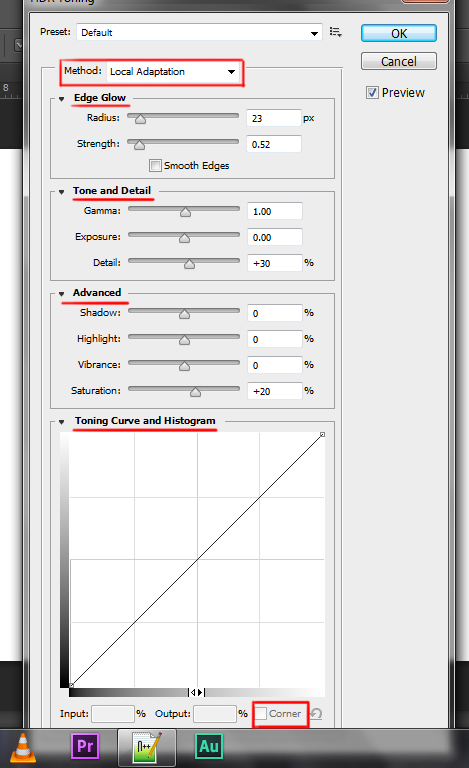
This option allows you to apply HDR effects to an image. HDR stands for High Dynamic Range. This option brings out the contrast of the image while preserving the shadow and highlighting details that are captured with bracketed exposure.
As you open up the dialogue box of this option, Photoshop will ask you if want to flatten your image or not. The first option in the dialogue box menu is ‘Methods’ which is a drop-down menu few options such as ‘Local Adaptation’ is set as a default option and is mostly used.
Underneath this option, there are four groups of options and these are:
- Edge Glow: This option controls the size of the ‘local adaptation’ zone. There are two sliders in this option. One is ‘radius’ which controls the local adaptation area in ‘pixels’ and ‘strength’ which controls the local adaptation area in ‘tones’. To keep the look if your image more natural I will suggest keeping the edge glow settings low.
- Tone and Detail: And this option provides three sliders that are gamma, exposure, and detail. In this option, you can adjust the brightness and details of the image.
- Advanced: This option has four sliders that are the shadow, highlight, vibrancy, and saturation. This option is used to make the original image more colorful and vibrant.
- Toning Curve and Histogram: This option is very similar to the curves option that I’ve explained above. The curve represents the tonal scale of the image. And if you check the ‘corner’ box at the bottom of the dialogue box you will find more control while with toning curve.
Variation
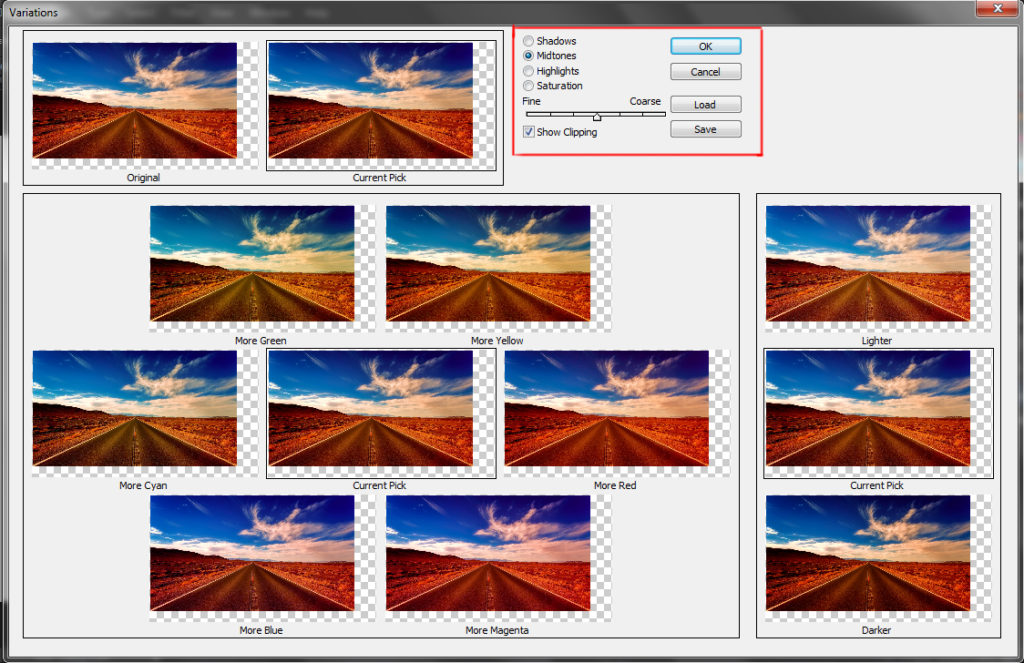
It is a color correction feature in Photoshop. This option allows you to make a color correction by visually comparing thumbnails of color variation your image. As you open the dialogue box of this option you can see a preview of your original and color corrected image.
You need to select a tonal range to make this option work. Mid tones, shadows, and highlights are used in adjusting the dark, middle and light areas of the image, while Saturation adjusts the color intensity or richness.
You can also adjust the color intensity by the slider dragging it to the right to increase the amount and in left to decrease the amount.
Desaturate

This option helps to convert the image into a black and white image. The shortcut key for using this option is Ctrl + Shift + U
Match Color
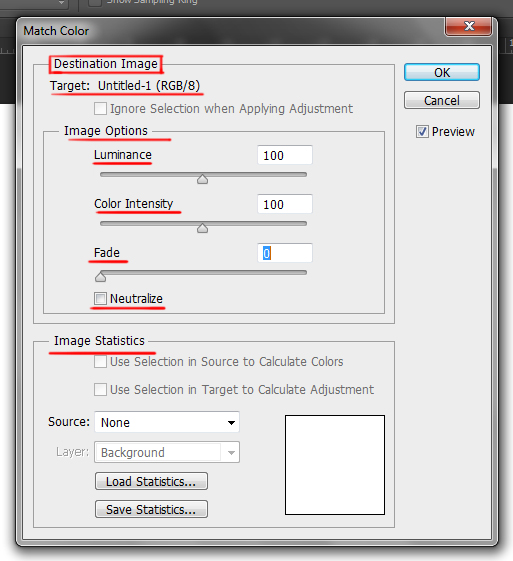
This option allows you to match the color of one image (source image) with another image (target image). You can also match the colors of the image in different layers in the same document.
As you open the dialogue box of this option you will see three sliders: luminance, color intensity, and fade. Luminance slider adjusts the brightness of the image, color intensity slider adjusts the color saturation and the fade slider fades the effects so that it can blend well with the original image.
Replace Color
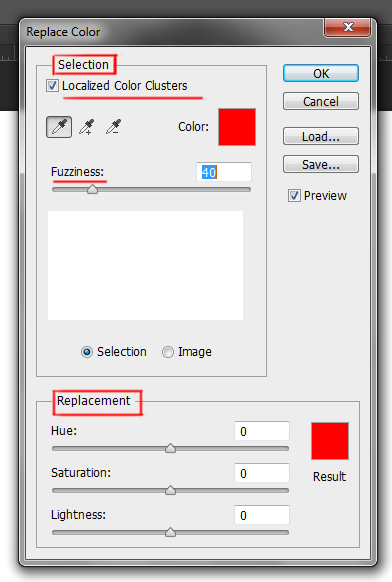
This option allows you to replace only specific colors of your image. As you open the dialogue box of this option you will find a slider called ‘fuzziness’ and it sets the tolerance of the replaced color masks. You can choose either ‘image’ or ‘selection’; in ‘image’ option you can see the full preview of the image in the preview window and in ‘selection’ option you can only see the mask on the preview option.
The masked area is black and semi-transparent or unmasked area is grey or white respectively. There are three eye dropper tool options in this dialogue box. The plus eyedropper option is to add more colors, the minus is to remove colors and the neutral is simply to pick colors.
Underneath all these options there are another group of settings called ‘replacement’ in which there are three more sliders, hue, saturation and lightness, which allows changing the color values of newly replaced colors. After completing the editing hit ‘ok’ button and the dialogue box will close.
Equalize
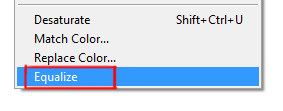
This is the last option on the flyout menu of the adjustment option. This option takes the lightest part of an image and turns them into white and takes the darkest to convert it into the black. So this option overall affects the contrast of the image.
Note:
- All these options in the flyout menu of ‘adjustments’ make destructive editing. So to avoid this, use the option as a smart filter or use this as an adjustment layer so that you can change it if you want, mask the unnecessary parts, change the blend mode or adjust the opacity.
- The options which have three dots after it is the ones which will open a dialogue box whenever you will click on it.
Related Topics:
- How to Add Falling Snow in Photoshop
- How to Create Rain effect in Photoshop
- Dual Light Effect in Photoshop
Auto Tone, Contrast & Color
There are three options for auto color corrections in Adobe Photoshop and these are:
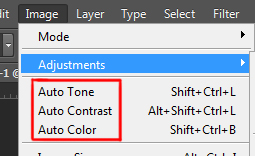
- Auto tone: It can instantly fix all the color and contrast issues in your image. This option samples the entire image and accesses the color values individually and then applies to the image ant an instant. The shortcut key for this option is Shift + Ctrl + L
- Auto Contrast: In this option, only three color values are combined together while adjusting the darkest and lightest pixels to give an effect of elevated contrast. The shortcut key for this option is Alt + Shift + Ctrl + L
- Auto color: In this option, instead of redistributing the colors, it neutralizes the mid tones and boosts the contrast. The shortcut key for this option is Shift + Ctrl + B
Related Topics:
Image Size
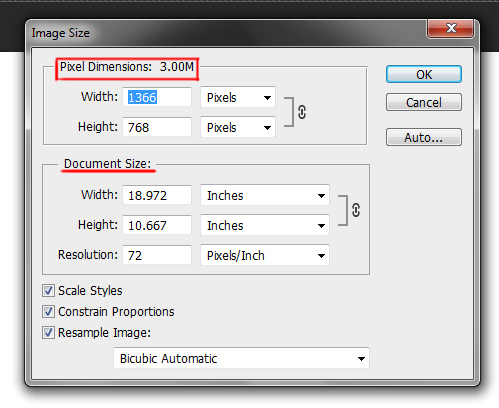
This option will tell you the size of the image that you have in your document. As you click on this option, it will open up the dialogue box. The first option is ‘Pixel Dimension’ which is a measure of a total number of pixels along the image’s width and height.
Underneath these, there is ‘Document Size’ where the width and height of the document are mentioned along with the resolution which is a number of pixels per unit measurement.
Below these options, there some few checkbox options like ‘Constraint Proportion’ and ‘scale styles’ and you should keep these options selected. The chain and bracket icon in the document area indicates that the ‘constraint proportion’ checkbox is selected.
The shortcut key for this option is Ctrl + Alt + I
Canvas Size
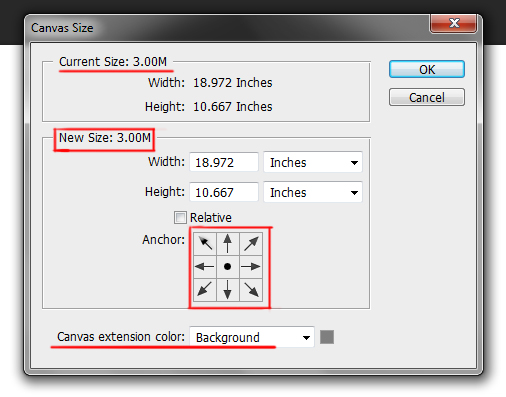
In this option, you can change the size of the canvas or page, where the image sits. If you are increasing the size of the canvas the space outside the image will be filled with a chosen color and if canvas size is decreased then the image can also be cropped. But, like image size, it doesn’t tamper with the quality or resolution of the image.
As you open the dialogue box of this menu, the first option is the current size of the image. Underneath that there is a group of option for ‘new size’, where you can mention the height and width of your new canvas. You can specify the desired anchor point which shows how an image sits on the canvas.
By default, Photoshop uses the center alignment and adds the canvas around it if the size is increased. You can click on any of the eight squares to change the default setting. You can also select the color of your canvas from the canvas extension popup menu.
The shortcut key for this option is Ctrl + Alt + C
Image Rotation
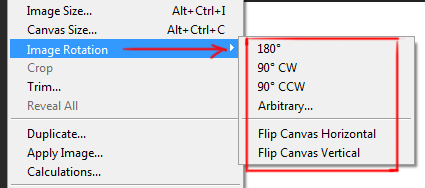
In this option, Photoshop allows you to rotate and flip the entire image. This command does not work on individual layers or image rather it works on the whole document. There are a few options in which you can rotate or flip your image. And these are 180’, 90’ (clockwise and counterclockwise), arbitrary where you can specify any angle for rotation and flip (Vertical and Horizontal).
Crop
This works in a similar way as a crop tool in Toolbar. To understand the crop tool in a proper way read the previous post for crop tool.
Duplicate Image

This option is used to duplicate the image in Photoshop to another document. As you click on this option, a dialogue box will open up which will show the name of the image as ‘Duplicate’ and will provide the option for changing the name of the newly duplicated image as ‘As’. There is a checkbox below these options which allows you to duplicate the merged layers only.
Trim
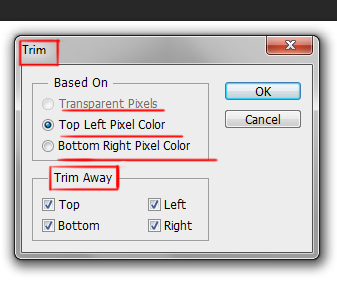
In the trim option, you can crop the unwanted data of the image. This option is similar to crop tool but works in a different way. As you open the trim dialogue box, you will see the three options on the basis of which you can trim your image.
- Transparent Pixels: This option removes all the transparency from the edges of the images and it leaves with a nontransparent image.
- Top Left Pixels Color: It trims the area which has the color of the upper left pixel from the image.
- Bottom Right color: It trims the area which has the color of the bottom right pixel from the image.
You can select one or more than one option to trim away: Top, Bottom, Left and Right. Just check those boxes which you want to have as an option.
Apply Image
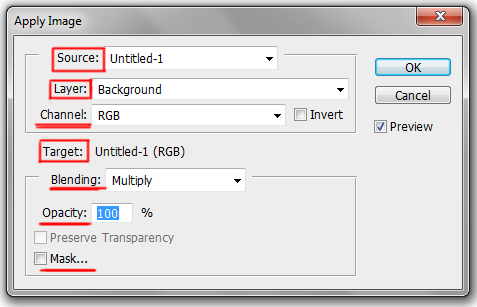
This command allows you to blend the one image’s (source image) layer and channels with layers and channels of another image (destination). As you open the dialogue box of the image, you will get the options for ‘source’ image’s layer and channel. There is also a checkbox for ‘invert’ which is unchecked as a default option and it can be checked if you want to use the negative version of the images channel content.
Underneath these, there is a group of setting for the target image, where blending mode and opacity of the target image is mentioned. Here, opacity means the strength of the effect. There are two checkboxes at the bottom of the dialogue box and these are:
- Preserve transparency: Which means the result will only be applied in the opaque areas.
- Mask: This is to mask the effect in the image. You can apply the mask on both blending and opacity and also can invert the mask.
Calculations
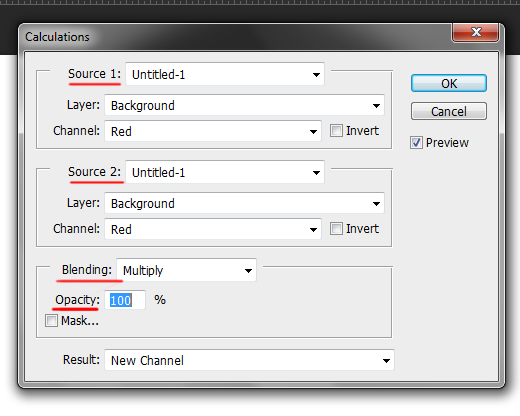
This option allows you two blend two different channels from one or more source image. But this command will not work on composite channels. As you open the dialogue box of this option the first set of the option you will find is of ‘Source 1’ image where there are layer and channel options. And the same settings also follow in ‘Source 2’ image. Blending mode, opacity and mask options are available in this dialogue box just like the previous ‘apply’ option.
Analysis
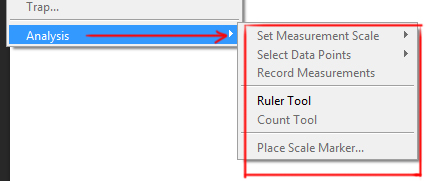
This is the last menu of the image panel and it contains detailed information about your image. This option allows you to take and record measurements in Photoshop. This tool opens up with a fly out menu which consists of many other options and these are:
- Set Measurement Scale: In this option, you can set a new scale measurement using the ruler tool.
- Select Data Points: This option allows you to save information in Photoshop.
- Record Measurement: In this option, you can find any custom measurements that you made.
- Place Scale Maker: In this option, you can set text and position options in Photoshop.








Comments are closed.